Back in 1992, Hurricane Andrew changed the game for building houses in Florida. The damages it accrued cost about $26.5 billion and, according to the NPS, “more than 250,000 people were left homeless, 82,000 businesses were destroyed or damaged, and about 100,000 residents of south Dade County permanently left the area in Andrew’s wake.”

This unprecedented disaster especially took a toll on the Miami-Dade County area. The massive devastation after Andrew is actually the reason that, since 2002, we’ve had a statewide Florida Building Code (FBC) in effect.

Can you believe that we didn’t have one before this? Prior to the FBC, there were still codes, but it was a hodge-podge of various different rules that the hundreds of jurisdictions statewide implemented and enforced, often inconsistently.

Today, Miami-Dade (and now Broward) Counties are considered the HVHZ (High-Velocity Hurricane Zone). They have the absolute highest requirements in the state for home hurricane protections– and actually, the nation. 

But areas outside of the HVHZ can still have a high risk of wind damage, so The Florida Building Code requires features such as “hurricane windows” (i.e., opening protection) in some other areas of Florida, but not all. 

So you see, determining which and even if you need hurricane windows in Florida can get pretty technical. Let us simplify it for you by breaking down what you actually need to know!

RELATED: HOW YOU CAN SAVE MONEY ON HOME INSURANCE WITH A WIND MITIGATION INSPECTION

What is Opening Protection?

hurricane-windows-in-florida

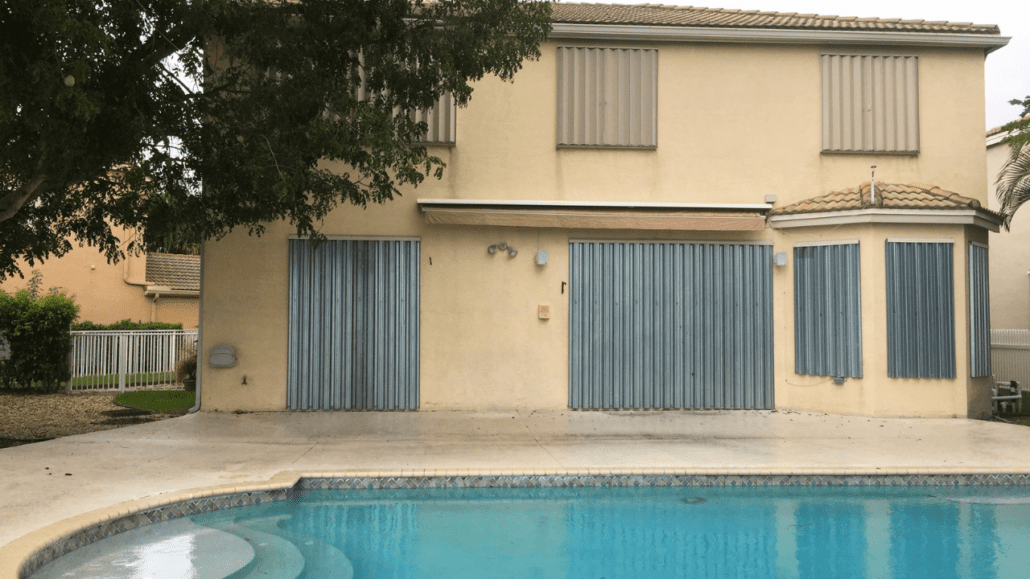
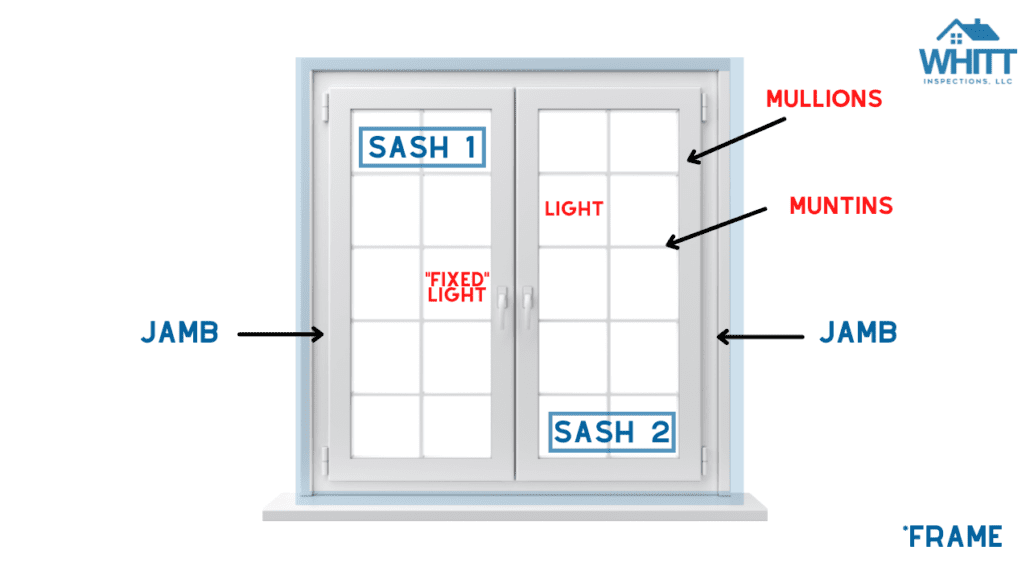
You may hear your home inspector mention “opening protection” for your home. This refers to any entry into your home that we consider an opening– typically doors, windows, garage doors, skylights, glass blocks, etc.

Opening protection means your doors and windows have a barrier that has been tested against debris impact and pressure in case of a hurricane. So, hurricane windows and hurricane shutters both fall under the umbrella of opening protection. 

Other aspects of opening protection include:

  1. Hurricane shutters
  2. Hurricane windows
  3. Impact windows
  4. Window/door boards, panels, and fabrics

It’s also worth noting that regulations and code requirements for each of these materials differ from county to county, and sometimes in different areas of the same county.

For instance, in Polk county, they don’t require opening protection whatsoever. But in Pinellas County, you definitely do! Plus, nearly all areas within 1-mile of the coast require it statewide. We call this the WBDR (Wind-Borne Debris Region), which the smaller HVHZ (i.e., Miami-Dade/Broward) sits within. 

Here’s a great map from SoFlo Impact Windows that demonstrates which counties in Florida are in WBDR and HVHZ areas that require higher-grade impact hurricane windows:

florida-HVHZ-areas

RELATED: HOME INSURANCE IN FLORIDA: WHAT YOU NEED TO KNOW

Code Compliance

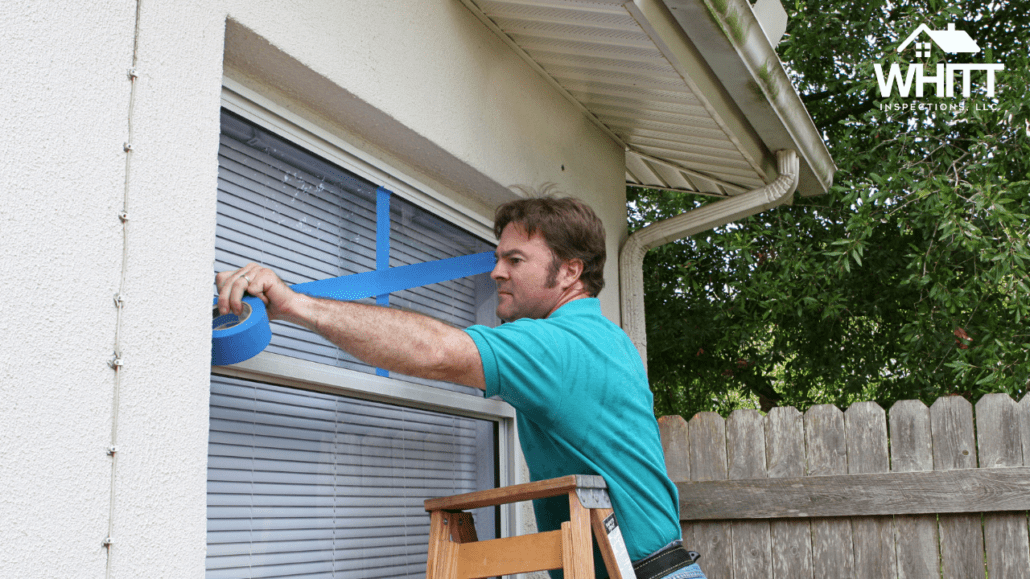
Home inspectors like us who also perform Wind Mitigation Inspections can investigate these aspects of your home. While we don’t perform code inspections, we can prepare a report for your insurance company that may help you qualify for discounts. 

The Florida Building Code is updated every 3-years. This includes the boundaries of the WBDR, which has expanded over time. We are currently on the 7th Edition as of January 2021. 

However, the wind mitigation report is valid for up to five years. Because of this, you should also have a new wind mitigation inspection performed and submitted to your homeowners’ insurance company every five years. 

During this inspection, we determine the weakest form of wind-borne debris protection of each opening. 

The levels of protection from strongest to weakest are:

  • Verified Materials: There should be proof on your home’s openings via a sticker, label, or imprint on the product itself. These can qualify you for higher insurance discounts.
  • Non-Verified Opening Protection products: We can usually tell when you have hurricane-resistant windows or openings, but if there isn’t verified proof, your Wind Mitigation Inspection must select this lower level of opening protection. 
  • No Windborne Debris Protection: This means that your home’s windows, for example, do not have any opening protection whatsoever. 

While the Florida Building Code can specify the required opening protection in your area, you typically do not have to install these features unless building new or performing a replacement. Understanding what’s required and where can be a real challenge. Therefore, we always recommend first contacting your local jurisdiction’s building department for the most accurate requirements at your specific address, before having any work performed.

RELATED: SUMMER HOME MAINTENANCE TIPS

Hurricane Window Ratings

hurricane-windows

We always get people asking about ratings when they inquire about their hurricane windows in Florida. But what they’re really asking — in a technical sense — is if the windows have approval ratings for both:

1.) Impact (i.e., large or small missile), and

 2.) Cyclic (i.e., pressure ratings).

Items that are verified as both Impact and Cyclic rated will have gone through independent testing proving their performance. They’ll have either a “Product Approval Number (i.e. FL#),” or a “Notice of Acceptance (NOA)” assigned to them. As mentioned above, this can be verified on the product with a sticker or imprint. The State of Florida provides the Florida Product Approval Number, while Miami-Dade County issues their similar NOA (Notice of Acceptance) to prove these products are “verified.”

It’s important to know that while some items are impact/cyclic verified for the WBDR, they are still not necessarily HVHZ approved. 

Before shopping for hurricane windows for your Florida home, you can search these online databases where you can find product approvals/acceptance yourself. But we still also recommend contacting your local building department, too. In construction speak, we call them the AHJ (Authority Having Jurisdiction).

Also, while the windows and doors themselves can be rated, some specific boards, panels, shutters, or fabrics can also be verified as rated opening protections, and are usually a more affordable option.

If your home is in an HVHZ area, you may even choose to install shutters over your already resilient hurricane windows for double-layer protection during hurricane season.

RELATED: WHY ARE POOL/SPA INSPECTIONS IMPORTANT?

How Much Do Hurricane Windows Cost?

hurricane-windows-in-florida

You’ll never be able to get a straightforward answer when determining how much hurricane windows cost. Location, materials, window size, and experience of your hurricane window installer all play a role in the pricing structure.

To give you an estimate, you can expect to pay about $62 per square foot for your hurricane windows.

RELATED: WHAT IS A WIND MITIGATION INSPECTION?

Hurricane Windows vs. Impact Windows Cost

There is no difference between hurricane and impact windows. As we hinted earlier, calling them hurricane windows is really a simple, generalized term. Because these windows are both impact and cyclic tested, you should know that they’ll cost more. According to Home Advisor, the average impact hurricane window will cost between $2,679-14,151.

how-much-do-hurricane-windows-cost-home-advisor

That’s a huge difference, right?

Our advice if you’re already a homeowner is to call your local building official. They’ll be able to tell you what opening protection you specifically need in your area (either on new builds or for replacing windows/doors). Compare these requirements to the windows/doors you already have installed. Look up the labels online for a FL# or NOA if you can. 

Maybe you already have what you need. Or maybe it’s time to shop around. Luckily, there are plenty of “hurricane window” contractors here in Florida. 

Lastly, after all is said and done, then it’s time to get a new wind mitigation inspection performed, which may improve the discounts on your homeowners’ insurance. 

Is it time for your wind mitigation inspection? Contact us for a quote!

A window screen replacement can be a pain in the butt. And in all honestly, it’s usually one of those things we ignore. After all, we still have our window to protect us from the Florida weather, right?

Well, not exactly. 

If you’re buying a home in Florida, your home inspection report will bring up damaged or missing window screens.

Why the heck would we do that? We’re glad you asked!

RELATED: WHERE TO SAVE A FEW BUCKS WHEN BUYING A HOME

3 Reasons Your Home Inspector Mentions Window Screen Replacement

While Florida doesn’t technically require homeowners to replace their ripped window screens, most home inspectors still make a note of it. Unless you are a property manager, then they are required for rentals.

This process is a lot more refined than first-time homebuyers realize. Aspects of a home that you may not have thought to look at (like window screens) might be a cause for concern later down the road. 

Overlooked home discrepancies like clogged drains can cause plumbing issues, while something as simple as a dirty filter can be catastrophic to your entire AC unit. And that’s a pretty costly deal— especially here in Florida. 

Your windows serve as a primary barrier between the safety of your home and the outside world. Broken screens are a structural and health-related concern that home inspectors find relevant to the home buying process. 

Here are some other reasons why we might suggest window screen replacement. 

RELATED: OVERLOOKED BASICS OF CARBON MONOXIDE AND SMOKE DETECTOR ALARMS

#1: To Keep Away The Mosquitos

damamged-window-screens-homeinspection

If you’ve lived in Florida long enough, you know that mosquitos are an ever-present pest. 

But did you know that, by far, mosquitos are the deadliest creature in the world?

Sure, you’re more likely to simply get an itchy bump on your arm if a mosquito bites you. However, mosquitoes carry diseases that are routinely transmitted to humans. 

According to the CDC, “West Nile virus is one of the most common mosquito-borne diseases in the continental United States.” Some other known illnesses caused by these creatures include Malaria, Yellow Fever, and Zika Virus.

Floridians are especially at risk because mosquitos are prevalent after heavy rains and hurricanes. Believe it or not, one million people die from mosquito-borne diseases every year

These window screens help keep you and your family safe. 

#2: Multiple Levels of Protection

window-screen-replacement

Window screens may not look like much, but they do more work than they’re given credit for. 

Besides critter protection, window screens can also expand the life of your windows. It helps prevent water from pooling along your window edges which can cause your window frame to rust.

When your window frame is damaged, it can lead to foggy windows (which will need replacing) or even excess water in your home. This water infiltration can cause mold, interior paint peeling, and other structural issues from Florida’s inclement weather. 

Window screens are also just an additive layer of protection in case something comes flying at your window!

#3: Cost For Window Screen Replacement

The total cost to DIY your window screen replacement is about $25-55. That’s assuming you only need to replace the screen and not the frame. Here’s a breakdown of everything you’ll need:

1. Aluminum or fiberglass screening $10-15

2. Spline replacement $15-20

3. Spline tool $10

4. Utility knife $10

5. Screen repair kit for small patches $3

Here’s a great video on how to repair your window screen:

To hire someone for window screen replacement, you’re looking at an average cost of about $135 per window. 

These costs aren’t something you would typically bother the seller with at negotiations. 

But when your home inspector tells you that it’s five window screens that need replacing, then it might be worth bringing up.


RELATED: 20 THINGS YOU SHOULD KNOW ABOUT YOUR HOME INSPECTION

How To Replace Window Screen Frame

When just one window screen needs replacing, all you need are the tools above for a quick DIY fix. The biggest issue for window screen replacement comes when the frame is bent. Now, you have the restore the entire screen unit.

So let’s get into how to replace a window screen frame.

Step 1: How to measure for window screens

cost for window screen replacement

Measure the width of your window first. Using your tape measure, go from corner to corner. Try to get to the nearest 1/8 inch. 

To measure the window height, find the lip. This is the rubber piece at the top and bottom of your window (where your previous screen frame sat).

For double windows, you’ll want to measure from directly behind the lip, up to the window channel (the section separating the top pane from the bottom pane). Add 1/8 inch here. 

Here’s a video on how to measure for window screens of various sizes. 

Now that you know your window’s measurements, you can choose the right size pre-framed window screen.

Step 2: How to remove window screens 

window-screen-replacement

Removing window screens and their frame is pretty simple. 

Open the window and press gently on the corner of the frame. This tension helps release the rounded springs that are at the top of the frame. You may need the help of a tool for this, but the bottom half should pop out from behind the lip. Get a grip on the bottom of the screen and pull down to release the frame from the window. Side note: On some windows this should be done from the inside, so if you’re having trouble, go to the other side of the window.

You may also have tabs on the bottom of your screen. If that’s the case, lift them simultaneously, and then push the screen out. Pull down to release the top of half of the window screen frame from the window.

For tricky window screen removals, watch this video

Step 3: Window screen replacement

window-screens

Now that your screen is out, you can choose to replace it with a pre-framed screen that you can get at Home Depot. Or you can re-screen it yourself using the tutorial above. 

To replace your window with a pre-framed screen, align it with the top half of your window opening. Try to get those springs into place.

From there, your screen should have tabs that you can use to lower the bottom of your screen behind the lip. It should snap right into place!

Here’s a video for visual instruction. 

RELATED: HOW MUCH DOES A HOME INSPECTION COST IN FLORIDA?

We hope this quick tutorial can help you DIY your window screen replacement (or get you a better deal for closing on your new home)! And remember to always ask your home inspector about the condition of your home’s windows and screens.

Speaking of, is it time for your home inspection? Contact us for a quote!

Living in Florida, knowing your window anatomy is actually pretty important. 

Between hurricanes, bugs, frequent rain, and hot summer days, your windows do a lot of work to keep you comfortable and safe. 

When we do home inspections, we always make a note of window discrepancies: is the sash slipping? Is the flashing tarnished? Is it time to replace your battered glazing with proper hurricane windows?

If you want to inspect your own windows, let us help by breaking down the various parts of a window. 

RELATED: 5 WAYS TO REDUCE YOUR ELECTRIC BILL IN FLORIDA

A Simple Break Down of Window Anatomy

window-anatomy

The truth is, without knowing window anatomy, you won’t know if all you need is a simple fix— or a complete window replacement. 

You just have some new terminology to learn! Plus, we’re sure your neighbors and friends will be super impressed when you explain the history behind window mullions during hurricane season. 

RELATED: HOW YOU CAN SAVE MONEY ON HOME INSURANCE WITH A WIND MITIGATION INSPECTION

The Basics

Speaking of mullions, let’s start with those.

Mullions 

Mullions are an ancient bit of architecture that isn’t technically necessary nowadays. Because we have the technology to support large windows (even floor-to-ceiling windows), these structural beams aren’t a standard unit in modern homes.

Window mullions are the vertical bases that hold a single window in its place. Or it’s the panel that separates individual windows that are side-by-side (see picture below).

It wasn’t until the Victorian Era that society found a way to build large, sustainable windows without the support of window mullions. 

Some people use this term interchangeably with muntins. However, there is a difference between window mullions and muntins.

window-anatomy

Muntins

Muntins are the vertical and horizontal parts of a typical depiction of a window.

Think about how you would draw a window: a square with two lines, right? Those lines are the muntins. They form the grid that used to hold window panes together.

Key words: used to.

Like mullions, window muntins aren’t necessary for modern architecture. These bars would hold smaller pieces of glass together to make a large window before we could construct large, stable pieces of glass. 

So fun fact: The window mullions and muntins that you see in post-Victorian homes are purely decorative. 

Glazing / Lights / Pane

We refer to each piece of glass held together by muntins as a window light or “fixed light.” A fixed light is a non-operational window (meaning it can’t open). 

When referring to window anatomy, glazing is technically the glass itself (also commonly referred to as the window “pane”). You can choose from various types of glazing, from single to triple thickness. This becomes important when you’re considering hurricane windows. According to glass.com,

“Hurricane resistant glazing is meant to help protect the interior of a building from the high winds, strong rain and projectiles… wind and rain can penetrate the building and cause structural damage to the building.”

Sash 

The sash is the part of the window that can open and close. The supporting structures are the stile (the vertical frame bars) and the rails (the horizontal frame bars).

Be sure to analyze the weatherstripping surrounding your sash. Damaged weatherstripping can be the reason rainwater or pests slip into your home ,or why your home seems hotter than usual.

RELATED: FLORIDA HOME MAINTENANCE CHECKLIST

Anatomy of the Window Frame

window-anatomy

Now that you understand the structural façade of your window choices, let’s get into the best part: the framing!

This part is (obviously) the compound that secures your window into the framing of your house. The window frame specifics are what you need to look out for if you have a leak or you’re looking for heavy-duty hurricane windows. 

Head 

This is the topmost part of your window frame. The horizontal beam is an essential part of the window anatomy because it helps lock the window panes into place. 

The head, along with the rest of the frame, will be made up of either: wood, vinyl, aluminum, fiberglass, etc. The sturdier the material, the better suited it is to withstand Florida hurricanes. 

Sill 

We all know what a window sill is, so we won’t go into too much detail. A window sill expands from the window into the interior of your home, like a shelf. It can also do this on the exterior of your home, but that is called a “stool.”

Underneath your window sill, you may notice what looks to be an extension of the window frame itself. This is called the window “apron,” and it’s only for decorative purposes. 

Jambs

Jambs are only the vertical beams on either side of your window’s entire frame. The horizontal beams are the head and the sill. 

Casing

And the casing is the decorative molding within your window frame (beneath the head and above the sill). It historically keeps the sash, jambs, and other hardware locked tight into place, although it’s more cosmetic today.

RELATED: I HAVE PLASTER WALLS IN MY HOUSE — NOW WHAT? A GUIDE ON HOW TO HANDLE PLASTER WALLS

Hardware

anatomy-of-a-window

And last but not least, let’s talk about hardware. These are the smaller “cells” (if you will)  that make up the rest of your window anatomy. 

Many of these parts are easily replaceable. Because this is probably the aspect of a window you’re most familiar with, let’s just breeze through these:

  • Check Rail: For double-hung windows (where you can raise the bottom sash), the check rail is the beam in between the top and bottom panes. 
  • Latch: Also called a sash lock. Just like doors, there are plenty of window locking mechanisms to choose from. 
  • Lift: The hardware that enables double-hung windows to lift open and close. 
  • Arm: This is what makes it possible for your windows to swing open or close. Known as either a scissor arm or extension arm.
  • Flashing: Typically made of aluminum, this material is water-resistant and helps fill in any gaps around your window’s frame. 
  • Caulking: Usually silicone, latex or an acrylic urethane that borders your window frame to keep exterior elements from seeping through the cracks. Flexibility is key here.

RELATED: WHAT IS A WIND MITIGATION INSPECTION?

Conclusion

Now that you understand the anatomy of a window, you’ll know exactly what to ask for when you shop for new ones! Do you want the traditional-style windows with mullions in the windowpane? Or do you want to go for the more modern, double-hung windows with easily replaceable hardware?

UP NEXT: HOW TO FIND A STUD IN A PLASTER WALL

It’s the most wonderful time of the year— to learn how to install LED light strips!

No, this guide isn’t for your Tik Tok videos (although it could be). Many homeowners see the appeal of these LED fixtures for different areas in their homes. They’re less harsh than overhead lights, simple to install, and they won’t give you away when you sneak into the kitchen for a midnight snack. 

So, just in time for the holidays, let us break down why, where, and how to install LED lights. 

RELATED: 8 HOLIDAY LIGHTING SAFETY TIPS

5 Clever LED Light Strip Ideas

how-to-install-led-light-strip

LED Light strips are relatively affordable; you can find a 100-foot roll on Amazon for about $20-$30. 

As a home inspector, I’ve come to learn that this little accessory (which is usually for decoration) is a pretty handy tool! Because you can adjust the brightness and even the length of the area that needs lighting, it’s pretty efficient for those hard-to-see areas.

We’ve seen a few creative LED light strip uses both in homes and used by professionals. Here are some ideas on how you can use them for yourself!

RELATED: HOW TO CHANGE OR REPLACE A LIGHT FIXTURE IN YOUR HOME

#4: LED Light Strips for Cars

When I started researching LED lights, cars were the last thing from my mind. When I think of LED lights in cars, I think about people installing colored strips that coordinate with their stereo. 

Kinda cool, but not really necessary, right?

However, these easy-to-install lights have come in handy for on-the-go professionals like myself. We drive a pickup truck for work, and while we’re usually pretty tidy with our tools, sometimes things get buried.

Installing a short (I’m talkin’ maybe a foot) LED strip in the back of your truck bed or underneath your front seats can help you locate those loose items that go amiss while driving around. 

Bonus LED Light Strip Idea: Get them for your toolbox!

#3: Home Lighting

We’ve inspected our fair share of homes in Florida. Lately, it’s quite evident that LED lights are becoming quite popular!

Besides your teenagers wanting these strips for their ceiling lighting (it’s the Tik Tok way!), you can steal a couple of yards of lights for yourself.

Here are some clever areas we’ve seen homeowners install LED light strips: 

  • Under kitchen counters or inside cabinets
  • Along the staircase
  • Behind TVs
  • Around a vanity mirror
  • In dark corners of a garage/shed

#2: Outdoors

These lights are not only flexible and easy to install, but there are waterproof options, too! This makes them the perfect accessory for outdoor things like:

  • Camping 
  • Boats
  • Outdoor parties
  • Bikes

#1: Holiday Decoration

So this one is a pretty obvious LED light strip idea. But it’s almost Halloween when we’re writing this, so it seemed worth a mention. 

If you’ve ever used these versatile lights for decoration, now you know that they don’t have to go to waste the rest of the year! Instead of packing away your waterproof LED light strip in your Christmas box, repurpose it for the areas around your house that we mentioned earlier.


RELATED: 5 WAYS TO REDUCE YOUR ELECTRIC BILL IN FLORIDA

How To Install LED Light Strip In 5 Minutes

how-to-install-led-light-strip

Now that you have some ideas on where you can use 100 feet of LED lights throughout your house, let’s get into the confusing part: how to install an LED light strip.

Don’t worry; it’s way more straightforward than it looks. It should only take you 5 minutes to install!

Step 1. Peel and Stick

We recommended doing this before figuring out where to cut the LED strip because it’ll be easier to determine how much you want to use. You can also pre-measure the surface area where the lights will go and make a note of how much you’ll need. 

Let’s say you purchased this 100-foot spool of LED lights from Amazon. How do you install them?

First, pick where you want them to be; let’s say you’re putting up lights underneath your kitchen counters. Make sure you clean the area with a dry cloth to get rid of dust. We also recommend placing your lights on a smooth surface for a more secure installation.

Next, unravel the strip so that it matches the length of your counter. These lights have an adhesive back, so you’ll just need to peel the backing off and stick it where you want it to live. 

Only do this one foot at a time. Press firmly along the light strip as you go to make sure it’s fastened securely to the surface.

Step 2. Where To Cut LED Strips

how-to-install-led-light-strip

This is the part that throws everyone for a loop. Most people realize that you can’t just cut a wire anywhere without risking damaging the entire circuit. 

Fortunately, these LED strips come with pre-soldered sections so you can choose your light length at varying intervals.

You’ll find copper-colored markings (see above) throughout your LED light strip. Simply choose your length and cut a vertical line through the designated copper area. 

Note: Make sure you cut a straight line! A crooked cut could prevent your LED light strip from working correctly.

Step 3. Lights, Camera, Action

Once your strip is cut and put into place, you need to connect it to the main power supply unit (the receiver).

This little unit (white or black) should come with your lights. It will have 3 or 4 “pins” sticking out of it. Connect this to the cable at the beginning of your light strip. Then, connect the receiver box to your electrical outlet and watch your lights come to life!

It’s all plug-and-play.

Here’s a great tutorial on how to install LED light strips. However, we don’t recommend twisting the strip to get around corners, which could damage your lights. Read the next section for a better solution!


Step 4. How To Install LED Light Strip Connectors

If you want to run lights across a large area, it may require you to use LED light strip connectors. Think of them like elbows you’d use for PVC piping. They help the lights span across uneven surfaces, corners, and other obstacles you may find when installing your lights.

To go around corners, you can purchase additional LED connectors. There are flexible L-shaped, gapless, and T-shape connectors. All you’ll need to install these LED strips together is a connector clip (usually comes packaged together). Simply snap each strip into the connector and click them into place!

Naturally, if you want to place LEDs in a completely different area, then chances are, they won’t be able to connect to the main power supply unit or receiver that came with your lights.

In that case, you can purchase a separate power supply bank to attach the lights to. Here’s a tutorial on how to install an LED light strip to a power supply bank. 

RELATED: HOW TO FIND A STUD IN A PLASTER WALL

We hope this short tutorial on installing LED light strips comes in handy for all you homeowners out there! If you want more handy DIY tips from your favorite home inspection company, make sure to catch up on our Homeowners section of our website!

While inspecting homes across the Central Florida area, we run into various versions of this question all of the time: What’s the difference between plaster walls/ceilings and drywall? 

If you have an older home, or are considering purchasing one, you might need to learn how to handle plaster walls.

Drywall, on the other hand, is easier to deal with and probably more familiar to you. Most new homes these days are made with drywall, and you can easily find supplies at your local hardware supply store. Plus, there are plenty of drywall contractors you can call to help you out. 

You won’t be so lucky if you have plaster walls. 

RELATED: IS YOUR SUBPANEL WIRED WRONG? LET’S TALK ABOUT IMPROPER SUBPANEL BONDING

Plaster vs Drywall

plaster-walls-how-to

Learning how to spot plaster versus drywall is pretty straightforward. The short answer is that plaster is literally harder than drywall. You may also notice that plaster walls are more susceptible to cracking from building settlement or thermal expansion/contraction.

Plaster is also harder and more time-consuming to install and repair. It’s literally a rock, making for quieter and “cooler” feeling spaces. It’s a material that is generally durable and resilient to moisture, which is why it used to be popular in Florida homes. 

Plaster 101

Plaster is applied “wet” by hand troweling, often in multiple layers over a wood or metal lath, or gypsum lath boards. Thus, the thickness of plaster can be somewhat inconsistent since it is applied by hand.

It’s held on by suction, mechanical bonds such as “keys,” or a chemical bonding agent. For the uninitiated, plaster walls present challenges to securely hanging pictures or TVs on the wall (although it’s definitely possible if you learn how).

Check out our related article on HOW TO FIND A STUD IN PLASTER WALLS.

Drywall 101

On the other hand, drywall is much easier, faster, and cheaper to install and repair. Unlike the “wet” application of plaster, it is put on in dried sheets, hence the name DRYwall. It attaches to the wall studs and ceiling trusses by the use of screws or nails.

Then, the seams and fasteners are finished smooth with tape and a joint compound “mud.” It provides a “warmer” feel to a room. Like plaster, drywall offers a level of fire resistance.

Many repairs can be DIY if you have drywall vs plaster walls. And if that’s not possible, good drywall tradespersons are much easier to find than those with plastering skills.

However, drywall isn’t as sound-deadening as plaster, and it’s actually much less resilient to moisture. Just ask those in New Orleans affected by flooding from Hurricane Katrina.


There’s nothing “wrong” with either product. But while they serve the same intent, they are very different.

Each material has advantages and disadvantages that are important for homeowners to understand. Here’s a great video by Leah from the YouTube channel “See Jane Drill” that will help with this. She’s got the true heart of a teacher and is one of our favorites!

The History of Plaster vs Drywall

Plaster has millennia of history behind it. Literally 1000’s of years. The Babylonians, Greeks, Romans (including the Italians), and Egyptians all used plaster. So did the ancient peoples of China and India.

Suffice to say, it’s an ancient building product. Plaster has multiple varieties, textures and chemistries using diverse materials such as clay, lime, or gypsum. 

You’re probably familiar with exterior plastering, which is usually referred to as stucco. In England and some areas of the US, they call plastering “rendering” or “parge coating.”

Venetian plaster has marble dust added, while rammed earth or waddle-and-daub are more primitive plastering techniques usually created from locally sourced materials.

But at the end of the day, it’s all a form of plastering.

We won’t go into all of the details now. Although, Wikipedia has a rather comprehensive article that you can read here if you want to explore deeper.

Our focus today is on plaster in interior ceilings and walls that you may find in your home, known as “lath and plaster.”

Before we can talk about plaster finishes on walls and ceilings in homes, we want to contrast it with what you may be more familiar with in today’s modern homes- drywall.

Sheetrock® vs Drywall

what is the difference between sheetrock and drywall

Drywall is known by many names, such as gypsum board (or gyp board), plasterboard, wallboard, or the brand name Sheetrock®. So if you’re wondering what the difference between Sheetrock® and drywall is, the answer is— nothing.

It’s essentially the same thing.

In the scheme of the built environment (including houses), drywall is a relatively newer invention. The earliest form of drywall was available in the USA around the late 1800s. It was patented as “Sackett Board,” named after its inventor, Augustine Sackett.

USG Corporation purchased Sackett Board soon afterward. They made various improvements to it over the years. In 1917, they released their upgraded version under the brand name Sheetrock®.

Many people still call it Sheetrock® today, but this is specifically USG’s brand name for drywall.

(Psst…As a side note, many brand names become common household names for products. We thought this was a fun read if you want to really geek out).


RELATED: EXPLAINING THE DIFFERENCES BETWEEN COPPER PIPE TYPES

Why Drywall is Used More in Modern Homes

drywall-vs-plaster

Drywall was not very popular at first, as it was considered a substandard, cheap, and gimmicky product. Many builders would not adopt its use. Instead, they preferred the familiar, time-tested use of lath and plaster. In the meantime, USG tried to market Sheetrock® as a fire-resistant product that required less time and labor to install but with limited success.

But then WW2 happened.

Massive labor shortages, followed by the baby boom and resulting housing boom, changed the game. The advantages of drywall became more evident, and it eventually became the dominant product by the late 1960s.

New interior plaster installs are rare today, except for the occasional installation on some custom-built, high-end residences and commercial buildings. So you’ll mainly see drywall installed inside in most modern homes.

RELATED: 5 WAYS TO REDUCE YOUR ELECTRIC BILL IN FLORIDA

So my house has plaster walls— what does that mean?

plaster-walls

Although it’s rare to find newer homes with plaster walls and ceilings, many older homes in Central Florida have lath and plaster instead of drywall.

Our personal home was built in 1967 and has plaster and metal lath walls and ceilings. It’s actually what’s known as a hybrid veneer-plaster system that uses a gypsum-based “rock lath” base layer, instead of the even older method using a scratch/base plaster coat over wood lath strips (as illustrated in the graphic above). Then, the rock lath is covered with an expanded (i.e. “diamond”) metal lath, and finally two coats of plaster.

The first plaster coat is a thick and rather rough “brown coat,” and the second one is a thinner white “finish/veneer coat” with a sanded texture (such as USG Diamond – Sanded). This final white coat is what you actually see on the walls and ceilings when standing in the room.

We love it for many reasons. Plaster is beautiful and full of character, with superior sound-deadening properties and moisture resistance versus drywall. The feel of authentic craftsmanship permeates the home.

The downside is that it’s tough to find tradespersons with the knowledge to repair it. While there may be more, we only know of one serious plaster repair company in the Tampa Bay region.

And they are always booked solid for months.

A word of caution: Plaster requires skill and patience. Many drywall contractors also claim to be able to fix plaster. But more often than not, they’ll use materials more familiar to them (i.e., drywall and joint compounds) in their work. This can lead to mixed (and sometimes pitiful) results. Don’t believe us? See what the folks over at Walls & Ceilings say about it.

Just be sure to do your research before hiring someone to repair your plaster. Make sure it is up to your standards.

If you want to attempt a DIY repair on plaster, it is possible. Here’s our favorite teacher Leah again, with some tips on how to repair plaster walls. There are also great tutorials and tips we’ve found on Old House Online, as well as from the Master of Plaster folks, and at Old Town Home.

Conclusion

We hope this helps some of you homeowners and home buyers out there understand the differences between plaster and drywall. Please don’t be afraid of plaster or deterred by it.

In our opinion, real plaster is excellent, charming, and worth preserving!

Read more about Home Improvement 

Since we were kids, we’ve been warned about the dangers of messing around with electrical outlets. So if you’re having some reservations about how to replace a light fixture, rest assured, it’s not just you!

There are plenty of reasons why you may need to install a new light in your house. Maybe you’re taking up an interior design project. Or maybe you don’t get enough light in a certain room in your house. 

Whatever the case may be, the first thing you need to do is make sure you have the right tools and the right instructions on how to install a light fixture. 

A word of caution: Some areas require permits to even replace a light fixture. So make sure you are aware of the rules in your area, prior to attempting any light fixture replacement project.

RELATED: IS YOUR HOME FIRE SAFE?

How To Replace a Light Fixture In 4 Easy Steps

The good news is that the steps for replacing almost any light fixture are universal. Even though your new light will come with its own instructions, the same process can be copied no matter where you’re replacing a light in your home.

Expect ceiling fans— those are a different story.

So use this as your official guide for how to install a ceiling light!

What You’ll Need:

  • Screwdriver
  • New light fixture
  • Screws and Wire Connectors (these typically come with your new light)
  • Ladder
  • Wire Stripper (maybe)


RELATED: WHAT YOU NEED TO KNOW ABOUT GALVANIZED PIPES

Step 1: Turn Off The Lights

how-to-replace-a-light-fixture-in-4-easy-steps

No— not just the light switch. For optimal safety, we recommend going to your circuit breaker and turning off the electricity right from the source.

This can turn into a duo project, too. If your circuit breaker isn’t labeled, this is the perfect time to get that done. Just turn on the lights in your house and turn off one breaker at a time. This helps you to see which breaker turns off which lights.

As you go through, make sure to properly label them for each room. Packing tape and a magic marker work perfectly for now.

Once you find the breaker for the room you want to replace a light fixture, flip it off. Make sure to turn off the light switch in the room, too!

Step 2: Unscrew The Old Light

replace-a-light-fixture

A word of advice: if you’re replacing a ceiling light, your ladder needs to be tall enough. Working from underneath the light won’t work. You’ll need to be able to see inside the ceiling where it’s attached. 

Once you’re up there, grasp the ceiling light with your palm to keep it steady. As you begin to unscrew the light, you’ll notice it will still be attached by only the wires. 

Pro-Tip: To make your life easier, you may want to wear some type of utility belt so you can easily throw the screws somewhere so that your hands are free.

Your light may also be attached to the ceiling with caulk. If that’s the case, use your screwdriver or a utility knife to pry the material away from the ceiling. 

Now that you can see inside the electrical box, remove the connectors and untwist the wires. You can do this by hand. There may also be a screw attaching the light to the metal bracket. You’ll need to remove that with your screwdriver.

Sometimes when you replace a light fixture, the one you purchased will come with a new bracket. We recommend using that to make sure your new light fits properly. Your fixture’s instructions will have more details on the bracket.

It should be as simple as switching the old bracket, popping the new one in its place, and securing it with the provided screws. 

Hanging a Chandelier 

If you’re hanging something like a chandelier, make sure you measure how low you want it to hang first!

Here’s a great tip from the Wolberg Blog:

“A handy rule of thumb is that a chandelier should be 12 inches narrower than a table and have at least 48 inches of space from each of the room walls or edges. Hang a chandelier approximately 30 to 34 inches over a table with an 8-foot ceiling height.”

Some chandeliers can be heavy, so if it feels cumbersome consider making it a 2-person job.


RELATED: FLORIDA HOME MAINTENANCE CHECKLIST

Step 3: Connect the Wires— Properly

replace-a-light-fixture

This is the part that freaks some people out. 

As we mentioned, no matter what type of light you buy or where you buy it (Home Depot, Amazon, or Wal-Mart), the instructions are going to be the same. 

Still, you should read the light manufacturer’s instructions first. On the off chance that you didn’t get them (or you lost them), here’s what they probably said:

  1. Twist the black (hot) wire to the black wire in the electric box.
  2. Connect the white (neutral) wire to the white wire in the electric box.
  3. Twist the green/copper (ground) wire to the green/copper wire in the electric box.

You can learn more about the difference between hot, ground, and neutral wires here. 

Your new wires may look frayed on the ends. This is okay, but just make sure they aren’t broken or you may have to make a new cut. From there, you just need to twist the wire to the ceiling wires and use the wire “nut” or connector to secure them in place.

Nowadays, you can depend on light manufactures to have the appropriate amount of the wire insulation (the black, white, and green/copper casings) stripped. However, if there’s not half an inch of exposed wire coming from your wires, then you’ll need to shave off some of the insulation with wire strippers. Check out the video below to see how to properly strip a wire.

NOTE: If you don’t see a green or bare copper wire coming from the ceiling, then you will usually have a metal box and see a green “grounding” screw. Be sure to wrap the green/copper wire on your new light under that green screw and tighten it. Bend the end of the grounding wire slightly into a “Shepard’s hook,” then place it under the screw, and use your screwdriver to seal it tight. The correct way to do this is make sure the direction of the wire under the screw will be in the same direction as how the screw turns, so it will tighten the wire in place as you turn the screw tighter.


Step 4: Close Up and Test It Out!

how-to-replace-a-light-fixture-in-4-easy-steps

Now you’re going to gently fold the wires back into the ceiling canopy and screw the new light fixture into the bracket. You may also have a decorative nut for the outside of the light that needs to be screwed on for the finishing touch.

Then, just add in your light bulb of choice and any other potential light décor (such as a light chain), and voila— you have successfully replaced a light fixture!

Go back to your breaker box and turn the circuit breaker back on. Then you can flip on the light switch and watch your handy work come to light (everybody loves a good pun, right?). 

RELATED: UNDERSTANDING, RECOGNIZING AND REMOVING CLOTH WIRING: YOUR COMPREHENSIVE GUIDE

Conclusion

We hope this helps all new (and old) homeowners easily replace a light fixture! Always be careful when you’re dealing with electrical units. If you never got a home inspection (or it’s been a few years) there’s no telling what 

Speaking of home inspections… is it time for yours? Contact us for a quote!


NEXT: CUT ATTIC TRUSSES 101

As home inspectors, we’re always seeing home discrepancies that can cause your electric bill to skyrocket. So, if you want to learn how to reduce the electric bill all year round, stick around. We have a few tips up our sleeve that you’ve probably never heard of. 

Living in Florida is living in actual paradise— but at a price. 

Literally.

We know it gets hot in other states, but the Florida heat is relentless. You’ll only get a few breaks here and there throughout the year. This means your AC is on full blast continuously, causing your electric bill (and stress levels) to be on full blast as well.

Whether it’s summer, Florida winter, or spring, there are some small things around your house that can save you some money.

RELATED: SUMMER HOME MAINTENANCE TIPS

How To Reduce the Electric Bill in Your Florida Home

how-to-reduce-the-electric-bill

There are typical, simple ways to reduce an electric bill. You probably already know that blackout curtains, unplugging your devices, or turning off your ceiling fans when they’re not in use can make an impact.

But realistically, these small steps will save you— maybe $20 per year? 

If you want to learn how to cut your electric bill in half (okay… maybe by a third), then you need to be paying attention to the stuff that eats up the most energy. This means paying attention to your thermostat, filters, and even your windows. 

RELATED: HOW YOU CAN SAVE MONEY ON HOME INSURANCE WITH A WIND MITIGATION INSPECTION

1. Adjust Home Temperatures

how-to-reduce-the-electric-bill

The rule of thumb for any homeowner is to keep your thermostat at 78 degrees. Of course, here in Florida, that might seem a little too warm. So, let’s say between 75-78 degrees Fahrenheit. 

Did you know that if you have a programmable thermostat, you can automatically set your AC to adjust to this ideal temperature? Adjusting the temperature while you’re away at work is a great way to reduce your electric bill. Duke Energy even confirms, “For every degree the thermostat is set above 78, customers can save up to 10% on their cooling costs.”

And if you have pets, don’t worry— you only need to increase the temperature 3-5 degrees so it should still be comfortable for them.

If you work a 9-5, for example, you can auto-set your programmable AC to climb a few degrees at 9 a.m. To make sure the house cools down by the time you get home, you want to set your thermostat goes back to that 75-78 degree mark at 4 p.m. 

Now, keep in mind that instructions vary depending on the type of thermostat you have. If you have a traditional thermostat like a White Rodgers, you can adjust the desired temperature for both systems — Heat and Cooling — by simply using the arrows. Some even allow you to program temperatures for certain days time and specific days of the week. Here’s a tutorial on how to adjust those settings.

If you have a fancy, updated programmable Smart Thermostat like the Honeywell 9000 the setup is pretty simple. Here’s a great video tutorial on how to use it:

Some more advanced thermostats, like the Nest or EcoBee can detect when you’re away or at home, and adjust accordingly. They may even offer energy savings adjustments based on your routine behavior. Pretty cool!

Adjust The Water Heater

Another way to lower your bill is to adjust your water heater. If you have a tank-style water heater, it has to continuously store and reheat water in its tank so that you have the luxury of taking a hot shower within minutes of turning on the showerhead. However, all the work to disperse warm water to your shower, sink, and dishwasher costs money.

By lowering the temperature on your water heater, you’ll use less energy which can save you money. Ideally, you want this temperature set at 120°F, as setting it any lower can cause sanitary and water quality issues. 

And if you plan on going on vacation anytime soon, make sure to adjust the temperature on both your AC and the water heater! Just remember, that due to the high-humidity in our state, we do not recommend turning off the AC completely. A lot of people don’t realize that AC’s don’t just cool, they condition the air, which means they also dehumidify it, as well.

RELATED: WHERE TO SAVE A FEW BUCKS WHEN BUYING A HOME

2. Replace AC Filters

how to lower electric bill

If you want to know how to reduce the electric bill in a really effective way, replace those AC filters! 

The filters in your home are meant to help your HVAC system running smoothly.

Your HVAC, if you didn’t already know, stands for Heating, Ventilation, and Air Conditioning. Your filters support the HVAC because they trap debris that is in the air. 

If your filter is too congested, then that will reduce airflow and thus, the efficiency of the system. Some of that debris may start slipping onto your HVAC coil, reducing the quality of your AC, heating, etc. And because your HVAC will be working so hard to clear the air (literally), it runs up your electric bill. 

How often should you replace your filters to reduce your electric bill? It really depends.

The size of your home, your household, and the type of filter you have all play a role in frequency. For example, if you have pets, you probably need to replace them more often. And standard fiberglass filters need to be changed every 30-days, whereas  some pleated filters can last 3-6 months. There are even media filters that can last up to a year without needing to be replaced. We recommend checking the manufacturers instructions to get a better idea of how often they should be changed. Generally, 30-90 days for most common filters is what we see.

RELATED: HOW MUCH DOES A HOME INSPECTION COST IN FLORIDA?

3. Pay Attention To Washer & Dryer

how-to-reduce-the-electric-bill

Speaking of filters, you are cleaning out your dryer filter after every cycle… right?

Not only does a clean dryer protect you from house fires, but it also makes sure your dryer is working properly. If you’re noticing that your clothes still aren’t completely dry after an hour, it’s probably from dryer filter neglect (or it could mean the dryer vent is clogged).  

When you constantly have to turn your machine on to dry the same load, you’re going to notice a spike in your electric bill. 

More advanced dryers also have the option to auto-sense when your clothes are drying. Maytag recommends this feature because it saves you the guesswork and it’s energy-efficient. 

Another way to recuse your electric bill is the washer. Try washing your garments in cold water. That way, you aren’t using the water heater as often and the energy spent heating and dispersing hot water is saved. 

 Also, make sure you adjust the load size for every wash so you aren’t using more energy. In fact, we recommend only washing when you have a full load. Running that thing uses up a ton of electricity. The less you have to use it, the better.

RELATED: FLORIDA HOME MAINTENANCE CHECKLIST

4. Lower Your Electric Bill in the Kitchen 

how-to-reduce-the-electric-bill

The kitchen is a hive full of energy. From the oven to the dishwasher, there are so many ways to cut back on your electric spending in this room alone. 

For starters, if you have a grill, try to use that instead of the oven when you can. The oven uses between 2,000 and 5,000 watts, which can run you about $5.85 per month. 

That might not seem like a ton of savings, but paired with these other energy-suckers, it all really adds up.

The microwave is another tool you can cut back on using. Instead of using it to thaw your dinner meat, take out the meat a few hours before you’re ready to cook so it can thaw on the counter. We like free stuff!

Your dishwasher is another area where you can save a few bucks. Some towns actually have cheaper energy rates during “off-peak” hours. So consider washing your dishes at night when there’s less demand for energy use. Also, try not to use the heat dry feature too often (or at all). 

And did you know that keeping your freezer or refrigerator full, requires less time to keep it cool? Packing frozen veggies, fruits, and meats help insulate the fridge so that it stays cool longer and uses less energy.

RELATED: UNDERSTANDING, RECOGNIZING AND REMOVING CLOTH WIRING: YOUR COMPREHENSIVE GUIDE

5. Insulate

how to lower electric bill in the summer

The best method on how to reduce the electric bill is to insulate. Insulation regulates your home’s temperature. You might start noticing your home takes a while to cool down or heat up if you have poor insulation. 

That extra effort to adjust your home’s temperature means— you guessed it— higher electrical bills. 

Thankfully, there actually quite a few places in your home where you can boost your insulation usage:

  • Add insulation wrapping around hot water pipes where accessible. So much energy is lost through the pipe wall as it travels to the desired location. Plus, you’ll get a few degrees warmer water at the faucet without spending extra money.
  • Behind electrical outlets using electrical outlet sealers. Just make sure you turn off the breaker and verify the outlet is not energized before removing the coverplate!
  • Outside your home with insulated paint

Hiring a company to insulate your walls and attic space might also be necessary depending on how good (or bad) your home’s insulation is. 

You can use this online tool by The U.S. Department of Energy to see if you have the right amount of insulation based on where you live.

Conclusion

So those are all of our tips on how to reduce the electric bill in your Florida home! As always, if you’re in the market to buy a home, hiring a home inspector can help you pre-determine inconsistencies like poor insulation or a busted water heater. Contact us for a quote!

As a homeowner, you may not have expected to find yourself learning about the different types of copper pipes— but here you are!

It’s always a good idea to familiarize yourself with the components of your home. It can help prevent mistakes and unexpected costs or, at the very least, arm you with enough knowledge to navigate solutions should you run into problems (i.e., a pipe leak).

Copper pipes (also known as copper tubing) are popular in modern American homes. So, chances are good that you have copper plumbing in your house. Their primary function is to move potable water (aka your everyday drinking water). They are also commonly used in appliances such as air conditioners and refrigerators.

These pipes are sturdy, reliable, and (at least in Florida) can be expected to last nearly 70 years! However, their durability all depends on the type of pipe you have. Your location also plays an important factor because some cities have higher levels of acid in their water. The higher the acidic levels are in a given area, the quicker your pipes will corrode.

RELATED: UNDERSTANDING, RECOGNIZING AND REMOVING CLOTH WIRING: YOUR COMPREHENSIVE GUIDE

Different Types of Copper Pipes

types-of-copper-pipes-homeowners-guide

The easiest way to remember your copper pipe choices is to think of the great Dr. Martin Luther King: M.L.K. That’s because the types of copper pipe you’ll see the most often in a home are:

  • Type M
  • Type L
  • Type K

When it comes to copper, you’ll either find rigid or soft materials. The rigid copper piping can be anywhere between 10-20 feet. Soft copper is bendable, and you’ll typically see it coiled on a hardware store shelf.

So there’s a lot to consider here: do you need soft or rigid copper piping? How long does it need to be? What is it going to be used for?

As soon as you can differentiate the types of copper pipes, you’ll know which one you need to purchase (or fix). And don’t worry— it’s pretty simple! Here’s how you can determine whether you have copper pipe M vs. L vs. K.

RELATED: WHAT YOU NEED TO KNOW ABOUT GALVANIZED PIPES

Type M Copper Pipe

M copper pipes will be your thinnest option (about 0.032 inches on a 3/4″ pipe), and also the cheapest. You can usually tell which ones are Type M by the red markings on the outside. 

Because of its more delicate exterior, M copper pipes aren’t suitable for some applications. The strength and trajectory of the water may be too powerful, which means the copper is more likely to fail. However, it’s much easier to work with and is often the go-to choice in homes

for heating systems, vacuum systems, and domestic water services. Thin copper is great for interior piping because it’s the easiest to manipulate, making it a seamless option to navigate through the walls of your home.

You can find Type M in coils (soft pipes) or straight tubes (rigid pipes). They’re the most affordable option, but they also may not last as long as other types, particularly depending on the acidity of your local water supply.

RELATED: CUT ATTIC TRUSSES 101

Type L Copper Pipe

This is your medium-thickness option at around 0.045 inches for a 3/4″ inch pipe. It’s thicker than Type M but thinner than Type K copper pipes. You’ll recognize it immediately by its blue markings.

Like Type M, L pipes come in both flexible and rigid forms. Because of this and its dense exterior, you can use it for both outdoor and indoor plumbing. For outdoor use, you can use it for fire protection (e.g., sprinklers) or some HVAC systems. 

Type L copper pipes are famous for their ability to replace old water lines. Since they’re thicker than M-pipes, they won’t corrode or pit as easily, making them an ideal solution for old or leaky pipes.

With so many options, Type L copper pipes are the most popular. Plus, they won’t break the bank! They typically last longer than Type M pipes, even if you have acidic or hard water.

RELATED: WHAT IS GFCI PROTECTION  

Type K Copper Pipe

Of the common copper pipes, Type K one is the densest, with about a 0.065-inch thickness on a 3/4″ pipe. You’ll recognize it by the green markings on the outside.

These are used primarily for your main underground water lines, commercial installations, and HVACs. If you’ve seen a copper pipe on the outside of a house or building coming out of the ground, we can almost guarantee you it’s a Type K copper pipe. 

Type K’s can withstand just about anything, including heavy water pressure and even oil distribution. They can last up to 100 years, and you can even find soft K copper pipes!

Its strength and reliability make this type of pipe the most expensive, which is why they’re primarily used for commercial applications or situations where the highest durability is demanded. 

RELATED: HOW MUCH DOES A HOME INSPECTION COST IN FLORIDA?

Copper DWV Pipe

And finally, we have the DWV copper pipe. You might mistake a DWV as an M pipe at first, but it is easy to spot it by its yellow markings and, usually, its size. 

DWV stands for Drain-Waste-Vent because that’s exactly what they’re used for. Modern construction prefers to use plastic P.V.C. for draining and vent systems. These are becoming more difficult to find installed in newer homes. We will see them in older homes sometimes, but often as a part of a sewage system that includes cast iron pipes.

RELATED: HOW YOU CAN SAVE MONEY ON HOME INSURANCE WITH A WIND MITIGATION INSPECTION

How To Fix Any Copper Pipe Leak

types-of-copper-pipes

Now that you know which pipes are which, let’s talk about how to fix a simple leak. 

As you may have guessed, interior leaks are most likely going to be Type M or L. But before you run off to Home Depot for a replacement line, let’s first take a look at the warning signs and what they mean:

  • Green corrosion: This is known as “patina” and is copper’s version of rust. It’s an oxidation process and could be from water or air chemistry or simply because your pipe is older. 
  • Water: Is the water only leaking from the connection, or is water covering the entire pipe? The former means you may just need to “sweat” the tube (more on that in a sec) or use another form of repair at the connection, and the latter means you need a replacement pipe. 
  • Water stains on the wall/ceiling: Your pipe may just need soldering (i.e., “sweating”) at a connection, but it also may mean the pipe needs replacement. 

When there’s a heavy amount of green corrosion, it may be best to have your copper pipes replaced. However, if you’re simply noticing a small leak, then all you need to do is sweat (or solder) your pipes. There are also push and compression fittings available to make water-tight connections on pipes that don’t involve soldering/sweating and fire.

Here’s a great video on how to do that!


Ready for your Florida home inspection? Contact us for a quote!

Whether you’re a homeowner, a real estate agent, or a fellow home inspector, you need to recognize this one specific method of improper subpanel bonding. It can be dangerous and it’s just something you don’t want to mess around with. 

Here it is: Your ground and neutral wires definitely need to bond (or connect) together. But this is ONLY allowed in the main panel— never a subpanel, or anywhere else in the home.

This is a very common mistake we see in the electrical part of your inspection. Although some “professionals” have made this mistake by failing to remove the bonding screw/strap, it’s usually more a sign of amateur electrical work. 

That’s why today, we’re going to go over how to properly layout your subpanel wiring and what can happen if it’s not fixed right away.

RELATED: IS YOUR HOME FIRE SAFE?

What Are Subpanels?

neutral and ground wiring

Inspectors, you can probably sit this one out. But as a brief overview, your subpanel is one of the electrical boxes at your house (sometimes it’s in the garage). Not all homes have them, as some only have a main panel only. But if you have 2 or more panels, the one with the main “service disconnect” (i.e. shut-off) is the main panel, while any other panels are considered subpanels.

You may have also heard the main panel referred to as a service panel. This is the area where you have complete control over the power within your home.

One flick of a switch, and you can turn out all the lights. 

A subpanel has its own breaker switches, but not the main. These typically control specific rooms or appliances in your home or other buildings on your property.

RELATED: THE BASICS OF AFCI PROTECTION

Hot, Neutral and Ground Wiring— What’s The Difference?

In both of these panel boxes, there are four types of wires: 

  • Two hot wires (black or red casing)
  • One neutral wire (white casing), and  
  • One ground wire (green casing or bare metal wire – usually copper or aluminum) 

The hot wires carry the energy to a fixture (e.g. a wall plug or the stove in your house). For a 120V circuit, it will be just one hot wire. If it’s 240V (e.g. a dryer, water heater, or range/stove), then two (2) hot wires will go to those fixtures.

The neutral wires will then carry the energy (technically known as current/amperage) from those circuits back to the panel. This effectively completes the electric circuit, thus generating power. 

Congratulations, you now understand how electricity works (and with just three wires)!

So what’s the point of the fourth one— the ground wire? 

Ground Wires

bonded-subpanel-ground-wire

This one provides safety. 

Hot and neutral wires are dangerous because they’re constantly running electricity through them. When you have something like frayed wiring cords or loose wire connections, it can cause those wires and their electrical currents to get mixed up. This is what causes short circuits. 

Short circuits can emit sparks and cause fires. This is why we always recommend that you keep your appliances and electrical devices up-to-date. 

However, any potential short circuits are derailed with a ground wire because this sends all those faulty electrical currents right back to the source, or the ground.

This is why you need to separate the ground and neutral. But more on that in a second.

The main point is that the ground wire generally isn’t used at all as part of the normal circuit operation. It’s a backup (also known as a secondary or earth ground) and is only there for safety in case the neutral fails. This way, the electricity doesn’t end up energizing the body of the appliance… or a human body.

In fact, neutral wires are also called grounded conductors because they technically act as a ground as well. Consider them the primary ground. Actually, on older homes (the kind with only 2-prong outlets), there often was no additional ground.

We have come a long way!

RELATED: HOW LONG DOES A HOME INSPECTION TAKE?

Here’s What Improper Subpanel Bonding Looks Like

Your main panel and your subpanel both contain those four sets of wires

So here’s the difference and how you can spot novice electrical work.

Below is the anatomy of the main service panel. Code Check’s image shows how the neutral wire (white) is connected to the bus bar on the right. Further down that bus bar is a screw or strap that “bonds” it to the metal bar that leads to the left side of the panel. And on the left side of the panel, you can see the ground wires (also known as the EGC/GEC’s). This effectively bonds (or connects) the neutral and ground together in the same service enclosure. But remember, this can only happen in the main/service panel – never the subpanel.

subpanel-bonding

In Code Check’s subpanel wiring diagram, you can see that those neutral wires are not bonded. This means that the neutral wires are not connected to the ground wires. They both have their own individual paths in the subpanel.

subpanel-bonding

Why do you separate the ground and neutral in a subpanel?

So, why do you separate the ground and neutral in a subpanel? Because when we bond them together, it gives your neutral wire (the one carrying electrical currents BACK to the source) multiple pathways. 

That’s how the chassis of some equipment will become energized. The effect can be as seemingly harmless as “I touched the fridge, and it shocked me!” To far more serious matters. 

The most common issues that come from not separating ground and neutral wires in a subpanel are:

  1. Shock
  2. Corrosion
  3. Fire

subpanel-bonding

As we mentioned before, ground wires help prevent short circuits, therefore preventing things like getting a shock and house fires.

A short circuit usually happens when there are loose or frayed wires. But when there are numerous electrical faults or massive amounts of electricity coursing through these bad wires, adding a third wire to the same pathway— the ground wire— creates more risk to these events. 

Thus, the ground wire needs to have a limitless path (free of the neutral wire’s electrical currents) so that it can safely prevent short circuits.

Corrosion can happen because of improper subpanel bonding as well. This is because the excessive electrical currents (coming from the hot, neutral, and ground wires) can accelerate the rate at which metal pipes or buildings start to erode.

Check out this video for a visual!


RELATED: WHAT IS GFCI PROTECTION 

How To Separate Neutral and Ground in Subpanel

This is work for a qualified electrician. It’s often a simple repair, but needs to be left to the professionals.

The difference may be as simple as having a green screw or bonding strap connected in your service panel – and not having it connected in the subpanel. Sometimes we will see neutrals and ground wires terminated on the same bus bar in the subpanels as well, often when a novice adds additional circuits (such as in the garage). This is effectively bonding the ground and neutrals together. You can do this in the main panel, but never should do it in a subpanel.

Yep, separating your ground wire from the neutrals in your subpanel can be as simple as that. However, we always recommend having an experienced electrician take a look.

RELATED: ARE HOME INSPECTIONS WORTH THE COST?


Want us to inspect your subpanel bonding? Contact us for a quote!

I think we can all agree that real estate prices just about everywhere are feeling a little, well, insane.

This is just one area where economy inflation is rearing its head – gas, groceries, and many other everyday items are creeping higher.

As we emerge from the pandemic there are a few big-ticket items that you might want to re-consider as supply and demand settle down.