Wanna Know How To Paint a Room Properly? Here’s 3 Tips To NOT Screw It Up

You’d be surprised at how many people look for tips on how to paint a room. It may seem pretty straightforward, but it’s actually really easy to screw up.
Just by missing one step in the process, you could end up spending more money on paint and more time on the project. Next thing you know, your weekend DIY home makeover turns into a month-long endeavor.
So what exactly do people get wrong about painting their interior walls? There are questions like how many gallons does it take to paint a room? To prime or not to prime? Which order do you paint a room?
Plus, if you’re just moving into your home, you’re probably looking for paint that lasts. That’s why you don’t want to pick up any old brand of paint at Home Depot. Nothing at all against big orange, but knowing the type of paint, brushes, and primer you’ll need for this project is key for a flawless paint job.
We won’t get overly technical. Instead, let’s just walk through the steps on how to paint a room (properly), plus some extra tips you probably didn’t consider.
RELATED: SUMMER HOME MAINTENANCE TIPS
5 Steps On How To Paint a Room Properly
You’re eager to splash some fresh colors on your walls— we get it. But without accurately prepping your interior walls, you may not get the look you were going for.
If your plan is to paint this weekend, the best use of your time is to slowly prep throughout the week so that you’re ready for the Big Painting Day when it finally comes.
Step 1: Move Your Furniture
It may not be ideal to have your bedroom furniture displaced in the garage or family room, but it’s only for a few days! Do it. And cover your floors.
You could also opt to cover your furniture. But do NOT trust that you’ll just be extra careful— we promise it will go wrong.
Moving your furniture entirely will help you see blemishes on your walls, and it will make it easier to cover your floors. Plus, you’ll be able to measure your space more accurately.
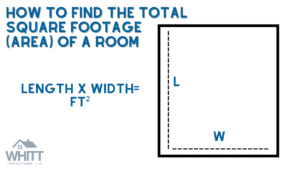
Once you move your furniture, measure the room’s length and width. Then use this formula to calculate the square footage:
Length x Width= Feet Squared
(Example: 10 ft x 10 ft= 100 square feet)
If you have a room that isn’t perfectly square or rectangular, you can find the total area by adding the square footage of the walls that make up the room. Here are some instructions on how to calculate odd room dimensions.
You’ll need about a gallon of paint for every 400 square feet. So if you’re painting a room that is 800 square feet, you should pick up at least two gallons of paint.
Step 2: Clean, Caulk, and Covers
Whether this masterpiece is taking place in the living room or the bedroom, you should thoroughly inspect your walls before picking up your paint.
With furniture out of the way, you’ll be able to see any scrapes or dents. For blemishes, all you need to do is wipe them off with soap and water. For dents or holes, you’ll need to buy some something to repair those with. This stuff is pretty good; it dries in minutes, and it’s only four bucks at Target!
While you’re at it, make sure to remove all the outlet covers for a truly blank canvas.
RELATED: HOW TO FIND A STUD IN A PLASTER WALL
Step 3: Sand and Tape
One of the best tips on how to paint a room really well is to sand it. In fact, you probably don’t even need to use a primer if you have good quality paint and use two coats.
However, if you’re painting over a semi-gloss or gloss paint, you should at least put some sandpaper to it and give it some “teeth.” It’s also worth “dry dusting” the walls to get rid of the sanding dust.
Now it’s time to break out the painter’s tape! We recommend painting the ceiling first, so secure the tape at the top of your wall at the very edge of your ceiling. If you’re not painting the ceiling, then tape off the trimmings using a good painter’s tape.
We also recommend taping around your outlets so that you do NOT paint inside the outlets or switches. That’s a BIG no-no, and potentially dangerous!
Step 4: Prime Time
This is one of our favorite tips on how to paint a room because it can save you money.
The most popular misconception we see from DIY painters is that you have to prime before painting walls. As we mentioned, primer isn’t inherently necessary for painting a room, contrary to popular belief.
There are only a few instances when you’ll need to prime beforehand:
- You’re going from a dark to light color
- The paint you’re going over is glossy
- Your wall is porous (e.g., you have thirsty, unpainted drywall or plaster walls)
- The wall is stained or has an odor
For example, if you’re going from white to Ultimate Gray and you do a quick wash of your drywall, you don’t need to waste time or money on priming.
Step 5: Paint Day
Now that you’ve taken progressive steps, you can rest assured that you’ll get the paint job completely done this weekend!
Another common question we see is which order to paint a room. Here’s our suggestion:
- First, paint the ceiling (if you’re painting it at all).
- Next, paint the trim (a.k.a “cutting in”).
- Then, paint the walls with the most real estate using a roller paintbrush. Use light pressure to paint from top to bottom.
RELATED: FLORIDA HOME MAINTENANCE CHECKLIST
3 Extra Tips On How To Paint a Room
Some people ultimately decide to hire professional painters because they have a few tricks that seem to get the job done faster. And well— professionally.
But we decided to give you a few tips on how to paint a room that are trade secrets (so, don’t tell anyone we told you)!
RELATED: HOW TO CHANGE OR REPLACE A LIGHT FIXTURE IN YOUR HOME
Tip #1: The Importance of Properly Prepping

As you can tell from the steps on how to paint a room, a proper prep should usually take longer than the actual painting itself.
At least, if you want a good result.
And if you want your paint to last for years to come, we recommend doing at least two coats of paint. This prevents “Flashing” or “Holiday-ing” (a common, unofficial trade term), which refers to a bad paint job where you can see a bit of the old paint color underneath.
Tip #2: “Cutting In”
This is just a fancy term for detailing at the edges of your paint job.
Cutting in is probably the most frustrating part of painting because it requires painting a straight line (such as the line between your wall and ceiling or two different wall colors).
The best way to cut in is to use a manual brush. Get the best brush you can afford for this. Try to refrain from painting the edge of your walls with a roller brush. Instead, use a stiff-bristled, angled brush to get those precise details.
Here’s a terrific video with visual tips:
Tip #3: Keep the Brush Moving
People like to dip their brush into the paint can and brush it along the side to eliminate the extra paint. After all, who wants paint splatter to end up all over the floor?
However, the better, more professional practice is to dip your brush into the paint and then pat the brush on the edge of the can to remove the excess paint. Then, quickly bring your paintbrush to the wall and keep it moving. This saves you from having to constantly dip your brush into the can, and it helps you achieve a more even paint job.
When you’re cutting in, the consistent movement helps you achieve that straight line. It also helps to use a “W” pattern with rollers to get the room painted faster and more consistently.
RELATED: WHAT IS THE BEST SOD GRASS TO GROW IN CENTRAL FLORIDA?
Tip #4: Types of Paint Sheens
Ok, we said 3 extra tips, but you’re getting 4 instead. Who doesn’t like a little lagniappe?
So finally, let’s talk about the types of paint sheens you have at your disposal. It can be overwhelming so let’s look at the most popular options for interior walls:
- Flat/Matte Paint: This paint hides more imperfections, but they scuff and rub away easily if you try to clean it too vigorously. You’ll notice that the interior paint (ceilings and walls) on new construction is almost always “flat” for this reason. A little tradesperson trick!
- Sheen/Glossy Paint: Glossier paints are easier to clean but are shiny and show more imperfections in the wall. However, they hold up better to moisture.
Then there are options such as eggshell sheen (great for interior walls), satin (best used in kitchens and bathrooms), and semi-gloss for casings (i.e., baseboards, trim moulding, etc.).
Benjamin Moore has an excellent guide for choosing paints based on which room you’re painting.
RELATED: HOW TO INCREASE CURB APPEAL
The bottom line when it comes to tips on how to paint a room: try to choose the best quality paint and brushes that you can afford and never skimp on good prep!


Leave a Reply
Want to join the discussion?Feel free to contribute!