https://www.whittinspections.com/wp-content/uploads/sites/51/2026/02/lakeland-hvac-spring-maintenance-guide-whitt-inspections-Feb-2026.jpg8961312Stephenhttps://d3bfc4j9p6ef23.cloudfront.net/wp-content/uploads/sites/51/2022/09/07221907/white_logo_transparent_background1-1030x698-1.pngStephen2026-02-25 00:32:212026-02-25 00:34:03Is Your Lakeland HVAC Ready for Summer? The Ultimate Spring Prep Guide
If you have an irrigation system or are planning to install one, you may have heard the term irrigation inspections and wondered what they involve. An irrigation inspection is a focused evaluation of your sprinkler system, designed to make sure everything is working properly, efficiently, and without hidden issues that could lead to waste or damage. Whether you are preparing a landscape for seasonal changes or trying to reduce your utility bill, understanding how irrigation inspections work can help you protect your investment and keep your yard healthy.
Understanding Irrigation Inspections
An irrigation inspection looks at the key components of your sprinkler system to confirm they are functioning as intended. These inspections are often recommended when buying or selling a home, installing a new system, or preparing for seasonal maintenance. They help prevent costly repairs and water waste by identifying problems early.
Unlike general home inspections that may glance at exterior systems, irrigation inspections are focused strictly on your sprinkler system’s performance and condition. From the control valves to the sprinkler heads and backflow devices, an irrigation inspection examines how the entire network operates together.
Why Homeowners Should Consider Irrigation Inspections
Irrigation systems are valuable, but they can be complex. Leaks, clogs, worn parts, and improper pressure can all reduce system efficiency and lead to higher water bills or damage to your lawn and garden. Insurance companies generally do not require irrigation inspections, but for homeowners, the benefits go beyond risk management.
Having a system professionally evaluated gives you peace of mind. It ensures that your sprinklers apply water evenly, that there are no hidden leaks eating away at your budget, and that the irrigation is set up to protect your landscaping investment. Detecting issues early can extend the lifespan of your system and avoid emergency repairs in peak watering seasons.
What Systems Are Covered in Irrigation Inspections
Irrigation inspections look at several components of your sprinkler system. These include the controller (or timer), valves, backflow preventer, water lines, sprinkler heads, and drip systems when present.
A key part of the inspection is verifying that the controller is programmed correctly and responding as it should. This ensures zones activate as expected and that timers match your landscape’s needs for efficient watering.
Valves and backflow preventers are checked for proper operation. Backflow devices are especially important because they prevent irrigation water from contaminating your home’s potable water supply — a safety concern as well as a code requirement.
The inspector also looks at water lines and pipe connections for leaks, breaks, or damage. Sprinkler heads are checked for damage, correct spray patterns, and proper alignment to avoid watering sidewalks or driveways instead of the lawn.
How These Inspections Differ From Other Inspections
An irrigation inspection is not the same as a full home inspection or a plumbing inspection. While a home inspection may briefly observe the presence of an irrigation system, it doesn’t evaluate every component for performance or efficiency. A plumbing inspection focuses on inside water lines and fixtures, whereas an irrigation inspection is dedicated to your outdoor watering system and its unique pressures and controls.
This dedicated focus allows irrigation inspectors to use specialized knowledge and techniques to find issues that a more general inspection might miss. It also means the report will be formatted specifically to document system health and any recommended repairs.
Preparing Your Home
Preparation for an irrigation inspection is minimal but helpful. Make sure the controller is accessible and that zones can be activated during the inspection. If your system has been winterized, arrangements can be made to restore water and enable testing.
Clearing tall grass or obstacles around sprinkler heads helps the inspector see them clearly. Providing access to the backflow preventer and any irrigation shut‑off valves also makes the process quicker and more accurate.
Common Outcomes After Irrigation Inspections
After an irrigation inspection, homeowners usually receive a detailed assessment of system performance and any issues found. The inspector may note leaks, misaligned heads, pressure irregularities, or components near the end of their useful life.
These findings can serve as a roadmap for repairs or upgrades. Addressing issues like leaks and improper spray patterns not only improves lawn health but can significantly reduce water usage and lower monthly utility costs.
For buyers and sellers, an irrigation inspection report can support negotiation and help avoid surprises after closing. For homeowners keeping their system long‑term, it provides clarity and a maintenance plan to prolong system life.
FAQs About Irrigation Inspections
What triggers the need for an irrigation inspection? Irrigation inspections are typically beneficial during home sales, after installation, or before seasonal changes in watering needs. They are also recommended if you notice uneven watering, soggy spots, or high water bills.
How long does an irrigation inspection take? Most irrigation inspections take between 45 and 90 minutes, depending on system size and accessibility.
Can a homeowner fail an irrigation inspection? There is no pass or fail, but significant deficiencies may be noted, and repairs or adjustments may be recommended to improve performance and efficiency.
Do irrigation inspections include testing water pressure? Yes. Water pressure is an important part of the evaluation because improper pressure can lead to inefficient watering and premature wear on components.
Is an irrigation inspection required by insurance? Irrigation inspections are usually not required by homeowners’ insurance, but they are highly recommended for system performance, water conservation, and landscape health.
Irrigation inspections help homeowners protect one of their most valuable outdoor assets, their landscape and sprinkler system. By identifying issues early and ensuring efficient performance, these inspections save money, reduce waste, and provide confidence that your irrigation system is ready to perform year after year.
https://www.whittinspections.com/wp-content/uploads/sites/51/2026/02/AdobeStock_62104884.jpeg.jpg12001961Spectorahttps://d3bfc4j9p6ef23.cloudfront.net/wp-content/uploads/sites/51/2022/09/07221907/white_logo_transparent_background1-1030x698-1.pngSpectora2026-02-18 19:11:322026-02-09 19:15:15Irrigation Inspections: Why They Matter for Homeowners and Your Landscape
https://www.whittinspections.com/wp-content/uploads/sites/51/2026/02/florida-home-freeze-protection.jpg5591024Stephenhttps://d3bfc4j9p6ef23.cloudfront.net/wp-content/uploads/sites/51/2022/09/07221907/white_logo_transparent_background1-1030x698-1.pngStephen2026-02-05 03:29:492026-02-05 03:43:04Record Florida Freeze: How to Protect Your Lakeland Home & HVAC
If you live in a hurricane-risk area or are preparing to insure your home, wind mitigation inspections are something you’ve probably heard about — but might not totally understand. A wind mitigation inspection evaluates the specific features of your home that help it resist wind and storm damage. The goal is to document how well your home is built to withstand hurricanes and other high-wind events, and in many cases, it can directly reduce your homeowners insurance premiums and strengthen coverage confidence.
Understanding Wind Mitigation Inspections
Wind mitigation inspections are especially common in Florida and other storm-prone regions where high winds impact structures. Unlike a general home inspection or a 4 point inspection, a wind mitigation inspection focuses only on the features that protect the home from wind damage — not the overall condition of every system or component.
Insurance companies care about wind mitigation because homes that have proven structural protections are statistically less likely to suffer severe wind damage. By documenting these features, homeowners can not only meet insurance company requirements but also unlock credits and discounts that reduce the cost of coverage over time.
Insurance providers use wind mitigation inspections as a tool to evaluate risk related to windstorms and hurricanes. In states like Florida, insurers are even required by law to offer premium discounts when a certified inspection shows certain wind-resistant features. This creates a direct incentive for homeowners to have their homes evaluated and documented.
For homeowners, that means a wind mitigation inspection report can help secure better coverage terms and potentially significant savings. In some cases, policies won’t be issued or renewed without this documentation — especially in high-risk hurricane zones where standard risk assessments may otherwise flag the home as a higher liability.
What Systems Are Covered
Wind mitigation inspections look at specific structural aspects of a home that help it resist wind forces. These can include how the roof is attached to the walls, the shape of the roof, the presence of impact-rated openings, and any secondary water resistance barriers installed.
Roof-to-wall attachment is a key element. This refers to how securely the roof is fastened to the rest of the structure: clips, hurricane straps, or other reinforced connections can significantly improve wind resistance.
The roof shape itself also matters. Hip roofs, which have sloped sides on all edges, tend to perform better in high winds compared to gable roofs because they distribute forces more evenly and are less likely to create uplift points.
Opening protections, such as impact-rated windows, hurricane shutters, and reinforced garage doors, are another focus. These features help prevent windborne debris from entering the home and creating internal pressures that drive structural failure.
Secondary water resistance systems, additional waterproofing barriers beneath roof coverings, are also evaluated when present. These help reduce water intrusion in the event of shingle loss during storms.
How Wind Mitigation Inspections Differ From Other Home Inspections
A wind mitigation inspection is not a full home inspection. It does not assess the condition of your electrical, plumbing, or HVAC systems like a 4 point inspection does. Instead, wind mitigation is laser-focused on wind-resilience features and how well they are built to protect the home.
Because of this focus, the report generated from a wind mitigation inspection follows a specific format that many insurers require — in Florida, for example, the official form used is the OIR-B1-1802, which insurers use to calculate applicable credits.
Preparing Your Home
Preparation for a wind mitigation inspection often begins with understanding what the inspector will be evaluating. Making sure that roof access is available, pulling documentation on storm-resistant upgrades you’ve already made, or ensuring impact-rated openings are documented can help streamline the process.
Unlike general home repairs, wind mitigation readiness is more about structural documentation than fixing visible defects. If your home already has reinforced features, you can make sure you provide the inspector with any permits, product stickers, or installation records to support their evaluation.
Common Outcomes After Wind Mitigation Inspections
After a wind mitigation inspection, homeowners typically receive a detailed report outlining the wind-resistant features found and any categories that did not qualify for credits. This report is used by insurance companies to apply discounts to your policy or determine if coverage requirements are met.
A successful inspection with several qualifying features can result in meaningful savings — some homeowners see double-digit reductions in their wind portion of insurance premiums. Even if not all features qualify, the report can serve as a roadmap to future upgrades that improve both safety and cost savings.
FAQs About Wind Mitigation Inspections
What age homes typically need wind mitigation inspections? While wind mitigation inspections are valuable for any home exposed to high winds, many insurance companies request them when issuing or renewing policies, especially in hurricane-prone states like Florida.
How long does a wind mitigation inspection take? Most wind mitigation inspections take 30 to 60 minutes, depending on roof access and home size.
Can a homeowner fail a wind mitigation inspection? There is no “pass or fail,” but the report may show that certain features do not qualify for credits. Homes without qualifying features simply won’t receive the associated insurance discounts.
Do wind mitigation inspections expire? In Florida, insulation and underwriting standards accept these reports for up to five years, though some insurers may have their own validity requirements.
Is wind mitigation inspection the same as a home inspection? No. A standard home inspection assesses overall condition, whereas a wind mitigation inspection specifically focuses on how well the home resists wind and storm forces.
Wind mitigation inspections are not just paperwork — they are a strategic way for homeowners to document resilience, improve insurance outcomes, and make their homes safer in the face of severe weather.
https://www.whittinspections.com/wp-content/uploads/sites/51/2026/02/AdobeStock_235808312.jpeg.jpg12011800Spectorahttps://d3bfc4j9p6ef23.cloudfront.net/wp-content/uploads/sites/51/2022/09/07221907/white_logo_transparent_background1-1030x698-1.pngSpectora2026-01-21 19:09:322026-02-09 19:09:42Wind Mitigation Inspections: How They Benefit Homeowners and Your Insurance
If your home was built in the 1960s or 1970s, a certified home inspection of its electrical wiring is extremely important to ensure it is safe for you and your family. During this period, due to copper shortages because of the Vietnam War, many homes’ branch-circuit wirings were made with single-strand aluminum. This substituted material has been identified as a fire-danger to homes due to aluminum’s poor conductivity, compared to that of typical copper. Occasionally, we’ve even found this wiring in homes outside of this era.
As a material, aluminum expands and contracts much more than typical copper wiring, which can cause loose connections as electricity passes through, potentially resulting in a fire. In fact, according to the U.S. Consumer Product Safety Commission (CPSC), homes that have aluminum branch-circuit wiring are 55-times more likely to have connections that are deemed fire-hazards than homes with typical copper wiring.
With a home inspection from Whitt Inspections, our inspectors are trained to identify homes with this dangerous aluminum-based wiring. A certified inspection is the best and safest way to ensure your home is safe from this fire-hazard, as without a direct, visual inspection, detection is nearly impossible. Aluminum-based wiring is prone to overheating and fire with no previous signs of issues, meaning a failure could happen at any moment with no previous indication.
Not only is aluminum much more prone to expanding and contracting, it is also more resistant to electrical flow than its copper counterpart, which means it requires larger wires to pass electricity. With homes today using more electricity, these dangerous and dated aluminum-wired circuits are more susceptible to being overloaded with greater electricity usage, potentially resulting in a fire. Aluminum wiring is also more likely to fall victim to corrosion as a result of usage and age, also posing a fire-hazard.
It’s important to note that not all aluminum wiring is considered bad, and some is still even installed on new construction today. These are mainly multi-strand aluminum wires, which are still regularly used on service and entrance conductors, as well as larger circuits in the home like the stove, water heater and HVAC systems. This is typically fine. It’s the single-strand wire variety that can be of concern. Although alloys were revised to this wiring over the years that may have somewhat improved its performance, single-strand aluminum is still a concern. Also, you may run into obstacles obtaining homeowners’ insurance. Fortunately, there are CPSC approved repairs available that can be performed by a qualified electrician, which many insurance carriers will accept.
If your home was built in the 1960s and 1970s, a home inspection to analyze the condition and material of your electrical systems is highly-recommended to ensure the home is safe. Call today to have your home inspected and have the confidence that it is in as great condition as possible. If we do find single-strand aluminum wiring, we will let you know and recommend options a qualified electrician can perform to repair or even replace them.
https://www.whittinspections.com/wp-content/uploads/sites/51/2019/09/cloth-wiring.jpg437582Stephenhttps://d3bfc4j9p6ef23.cloudfront.net/wp-content/uploads/sites/51/2022/09/07221907/white_logo_transparent_background1-1030x698-1.pngStephen2022-03-01 15:22:042025-09-14 15:43:10Certified Home Inspection for Single-Stranded Aluminum Branch-Circuit Wiring & Its Risks
https://www.whittinspections.com/wp-content/uploads/sites/51/2021/02/Galvanized-pipes.jpg346640Stephenhttps://d3bfc4j9p6ef23.cloudfront.net/wp-content/uploads/sites/51/2022/09/07221907/white_logo_transparent_background1-1030x698-1.pngStephen2021-12-08 16:21:392023-06-20 11:16:12What You Need to Know About Galvanized Pipes
Just because we’re all lucky enough to live in Florida doesn’t mean we can’t get into the holiday spirit! Now is the perfect time to get some plants for the season and bring a little color into your home.
We meet a lot of transplants throughout the year as they move to the Sunshine State. And while most are initially excited to trade in snow for sun, we notice that new Florida homeowners may sometimes feel a bit deprived during the holidays.
“It just doesn’t feel the same,” they’ll say.
Well, don’t worry because we’re going to show you exactly how you can deck your halls with festive plants to rejuvenate that holiday cheer!
7 Plants For Christmas That’ll Bring Holiday Cheer To Florida Homeowners
Florida weather is notoriously unpredictable. One year, it’ll be 55 degrees on December 25th, and the next, it’ll be 80 degrees.
With such uncertainty, picking out plants for this time of year probably seems like unnecessary stress. Our trick for Florida homeowners is to pick out the plants that can survive and thrive year-round!
Believe it or not, all 7 of these plants can survive the Florida heat and rain. Pay special attention to the care instructions, and you’ll have spectacular plants for years to come.
This one is interesting because you have a few color options! Home Guides says, “TheChristmas cactus is most often grown as a houseplant and blooms in a wide range of colors from the traditional red to purple, pink, orange, gold, and white.”
If you want to make a show of your plant, you can prune it throughout the year to encourage more buds to grow. You’ll need to do this before early Fall if you want your cactus to branch out by the end of the year.
You can keep this festive plant around for decades if you treat it right!
Care Instructions:
Keep indoors near bright, indirect sunlight. Don’t use artificial light if you want the colors to pop during the holidays
While these are definitely the most recognizable holiday plant, Floridians have a hard time hanging on to them year-round. Yet, they are considered tropical plants, and will thrive here. The biggest reason poinsettias won’t survive until the big day is because of overwatering.
If you plan on keeping these beauties around until the holidays next year, make sure to only water them when the soil (or leaves) feel dry to the touch.
CAUTION: Poinsettias can be toxic to your pets. Keep them as far out of reach as possible, and keep an eye out for white sap.
Care Instructions:
Water sparingly; about once per week
Keep in direct sunlight near a window or even outdoors
Here’s a fun bit of history about mistletoe you can use to impress your guests:
In America, the tradition of kissing under the mistletoe came around 1820 after the publication of The Sketch Book. The author, Washington Irving, recounted the Christmas Eve traditions he observed in England. One of which noted,
“The mistletoe is still hung up in farm-houses and kitchens at Christmas, and the young men have the privilege of kissing the girls under it, plucking each time a berry from the bush. When the berries are all plucked the privilege ceases.”
This traditional plant is actually parasitic, so it has to latch onto other plants in order to grow. In Florida, you can find mistletoe on:
Laurel oaks
Elms
Hackberries
Sycamores
Wild cherry trees
CAUTION: Mistletoe is poisonous when ingested. Make sure you wash your hands thoroughly after handling.
Care Instructions:
If grown organically, snip the mistletoe branch 6 inches from the root
Keep your freshly cut sprigs in the refrigerator until you’re ready to decorate
If you’ve planted new roots in Florida, you may find yourself dreaming of a white Christmas– just not the cold kind.
To replicate those northern holiday scenes, place a few bouquets of Cyclamen around your house. These are the perfect plants for the holiday season because their petals are bright white and heart-shaped! Cyclamen also comes in crimson red, pink, and purple.
This tropical plant thrives in warm climates and requires little looking after. The only downside is that these can be toxic to your pets (are we seeing a theme here?), so make sure they’re installed out of reach.
Care Instructions:
Plant during the Fall and keep covered if temperatures drop below 40 degrees Fahrenheit. Because Florida temperatures are typically above 70 degrees Fahrenheit, it’s best to keep the Cyclamen as a houseplant.
How typical! But here’s why we think holly is an excellent option for Floridians:
Does great outdoors
Wind-resistant to hurricanes
American, yaupon, and dahoon hollies are native to Florida
Holly is one of the most traditional plants for the holidays. It has green foliage with red berries, making your home appear merry and bright (literally).
While Christmas wreaths are made from holly, it’s actually more of a landscape plant. It can spread 12 feet wide and up to 40 feet tall! This makes it great for hedging.
However, it’s also an easy plant to pot and trim for a simple holiday accent piece.
Here’s a great video on how to grow evergreen holly:
Care Instructions:
Only female Holly plants produce berries, so make sure you get the right one!
Keep your freshly cut sprigs in the refrigerator until you’re ready to decorate
There are a ton of plants that bloom in the Florida weather, and amaryllis is no different. In fact, this is a plant that you can grow year-round.
You can find pre-potted amaryllis almost anywhere. This beautiful red plant often comes as a wax bulb and only takes 4-8 weeks to fully grow. That means you can get an Amaryllis bulb in November and have extravagant 6-inch wide flowers by December!
Care Instructions:
Amaryllis require little watering and will need access to direct sunlight
If purchased, you may not need to water your plant at all. Make sure you read the growing instructions that come with it.
The Candy Cane Sorrel blooms in the Fall and may whither during the summer. You can choose to plant these underneath an outdoor window sill, or have an entire candy cane garden on your own. However, they don’t do great in humidity or extreme heat, so consider potting this flower if you want to keep it around.
Another neat thing about this one? At night the petals will close up, making the flowers truly resemble a candy cane!
Care Instructions:
Keep in direct sunlight or partial shade
Bring indoors if the temperature drops below 55 degrees Fahrenheit
It’s hard to deny that November and December are the most anticipated months of the year. Between gift-giving, food, and family time, what’s not to love?
Oh, that’s right— the stress.
It wouldn’t be the holidays if something didn’t go awry, right? One year it’s the hassle of hanging up the Christmas lights, and the next, it’s burning the dinner turkey.
So, to make your holiday season more enjoyable, we’ve laid out advice for anything that could possibly go wrong.
From wrapping paper recycling to fire safety at home, here are tips on how to have a safe, fun, and merry holiday season!
Now, we’re giving these tips in the spirit of keeping your family safe. But they’ll also ensure that your home is always in pristine condition.
Something that will bode in your favor should you decide to sell.
As home inspectors, we can’t tell you how many of these simple, routine steps can fall through the cracks. And if you go year after year without checking on your home’s safety, you’re bound to have a few costly structural issues down the road.
With it being the end of the year, you probably had some of these on your To-Do list anyway. So, let’s go through this home maintenance checklist to make sure everything is in working order for the holidays this year.
Most of these fires started in December or January as natural Christmas trees start to dry up. What’s even scarier is the fact that the peak time for when these fires start is between 6 p.m. and midnight— when most of us are asleep.
So how can you prevent this Christmas disaster? Because decorative lights cause 17% of these fires, you should start by making sure your Christmas lights don’t have any frayed wires or broken bulbs. If they do, it’s time to replace them.
Cords, plugs, and wiring are the other contributing factors. So it’s worth investigating their state when you install them, a nd the condition of your outlets and other home fixtures such as nearby lamps.
And as always, unplug your tree before going to bed!
You may know your way around the kitchen, but we all know how chaotic it can be when cooking dinner for extended family.
With so much going on, even the most expertly choreographed chefs are prone to slip up. To eliminate any mishaps, here are a few things to be mindful of before prepping your extravagant dinner:
Thoroughly clean your kitchen surfaces: This diminishes grease buildup and frees up counter space.
Be mindful of clothing: Roll up your sleeves while cooking on the oven or over the grill. Also, be aware of loose towels or oven mitts. Try only to have 1 or 2 handy while you’re working.
Know your oven safety: Set timers for everything so nothing gets burned, keep kids and pets out of the kitchen, and try to clean as you go.
Speaking of house fires, it’s about time to check your smoke and carbon monoxide detector alarms.
Smoke alarm batteries typically need to be changed every 6-12 months, unless their sealed units. You shouldn’t have to replace the alarm entirely unless it’s over 10 years old.
Here’s how to test them to make sure they’re working properly:
Find the button on your smoke alarm
Press and hold down the button until you hear the siren
Replace the alarm’s battery if the siren sounds weak, low, or distorted
CO detectors can be plug-ins for your wall, or they’re embedded into your home’s electrical system. The latter should have a battery backup which you need to replace once or twice a year.
Here’s how to test your CO detector to make sure it’s working:
Find the “test” button
Press and hold down the button until you hear 2-4 beeps
Replace the alarm’s batteries you don’t hear the beeps
Your kids and guests should know your fire escape plan. Your escape plan should list at least two exit options, the location of your fire extinguisher and where to meet outside the home (the end of your driveway is always a safe place). You can even get cool printable escape plans to place around your house for everyone to see!
In case of an emergency, you should have two primary exits, so make sure nothing is blocking them (be mindful of where you place your holiday decorations). If you have guests who smoke, it’s best to offer them a comfortable place to do this outside. Have ashtrays readily available, along with water to pour on the butts for optimal safety.
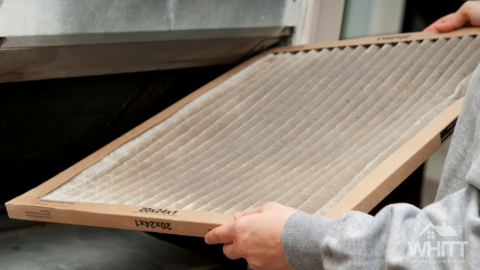
The type of air filter you have dictates how often you need to change it. If you have a disposable fiberglass air filter, you’ll want to change it every 30 days. For pleated filters, you can go as long as three months before having to pop in a new one.
To air (pun intended) on the side of caution, we recommend checking up on the condition of your filter once a month. This is especially true for homeowners who have pets, allergies, and larger homes.
So don’t forget to replace those filters so that your holiday guests can take a breath of fresh air. Literally. A new air filter can help eliminate pesticides, cleaning supplies, pollen, dust, and dander!
Throwing bows and ribbons into the fireplace might be a holiday tradition for your family, but it’s an ongoing problem in the U.S. The color pigments in your gift wrap can cause a chemical reaction when they burn, creating an insidious (and hazardous) flame.
So remember to recycle that wrapping paper this year, not rekindle it.
If you genuinely want to maintain an environment-friendly holiday, try to avoid using these items in your gift wrapping:
Bows: These aren’t recyclable, and they cause a mess at paper mills. However, you can recycle them by saving all the bows in a bin to reuse them next year!
Ribbon: You know how frustrating it is when a ribbon gets wrapped up in your vacuum? Imagine that happening to the machines at your local waste facility because of all the Christmas ribbon.
Glittery or metallic wrapping paper: Recycling wrapping paper is a great idea— in theory. But not all wrapping materials are created equal in the eyes of the sustainable community. According to this blog, “Wrapping paper cannot be recycled if it contains sparkles, glitter, sequins, foil, artificial texture, sticky gift labels, or plastic. Nor can it be recycled if it has been laminated or has loads of leftover tape, ribbons, or bows still attached.”
Do you have any tips for holiday safety? Let us know in the comments!
https://www.whittinspections.com/wp-content/uploads/sites/51/2021/11/holiday-safety-tips-1280x720-1.png7201280Stephenhttps://d3bfc4j9p6ef23.cloudfront.net/wp-content/uploads/sites/51/2022/09/07221907/white_logo_transparent_background1-1030x698-1.pngStephen2021-11-10 16:57:502022-03-18 19:46:04Here are a Few Safety Tips For Homeowners During the Holiday Season
You’d be surprised at how many people look for tips on how to paint a room. It may seem pretty straightforward, but it’s actually really easy to screw up.
Just by missing one step in the process, you could end up spending more money on paint and more time on the project. Next thing you know, your weekend DIY home makeover turns into a month-long endeavor.
So what exactly do people get wrong about painting their interior walls? There are questions like how many gallons does it take to paint a room? To prime or not to prime? Which order do you paint a room?
Plus, if you’re just moving into your home, you’re probably looking for paint that lasts. That’s why you don’t want to pick up any old brand of paint at Home Depot. Nothing at all against big orange, but knowing the type of paint, brushes, and primer you’ll need for this project is key for a flawless paint job.
We won’t get overly technical. Instead, let’s just walk through the steps on how to paint a room (properly), plus some extra tips you probably didn’t consider.
You’re eager to splash some fresh colors on your walls—we get it. But without accurately prepping your interior walls, you may not get the look you were going for.
If your plan is to paint this weekend, the best use of your time is to slowly prep throughout the week so that you’re ready for the Big Painting Day when it finally comes.
Step 1: Move Your Furniture
It may not be ideal to have your bedroom furniture displaced in the garage or family room, but it’s only for a few days! Do it. And cover your floors.
You could also opt to cover your furniture. But do NOT trust that you’ll just be extra careful— we promise it will go wrong.
Moving your furniture entirely will help you see blemishes on your walls, and it will make it easier to cover your floors. Plus, you’ll be able to measure your space more accurately.
Once you move your furniture, measure the room’s length and width. Then use this formula to calculate the square footage:
You’ll need about a gallon of paint for every 400 square feet. So if you’re painting a room that is 800 square feet, you should pick up at least two gallons of paint.
Step 2: Clean, Caulk, and Covers
Whether this masterpiece is taking place in the living room or the bedroom, you should thoroughly inspect your walls before picking up your paint.
With furniture out of the way, you’ll be able to see any scrapes or dents. For blemishes, all you need to do is wipe them off with soap and water. For dents or holes, you’ll need to buy some something to repair those with. This stuff is pretty good; it dries in minutes, and it’s only four bucks at Target!
While you’re at it, make sure to remove all the outlet covers for a truly blank canvas.
One of the best tips on how to paint a room really well is to sand it. In fact, you probably don’t even need to use a primer if you have good quality paint and use two coats.
However, if you’re painting over a semi-gloss or gloss paint, you should at least put some sandpaper to it and give it some “teeth.” It’s also worth “dry dusting” the walls to get rid of the sanding dust.
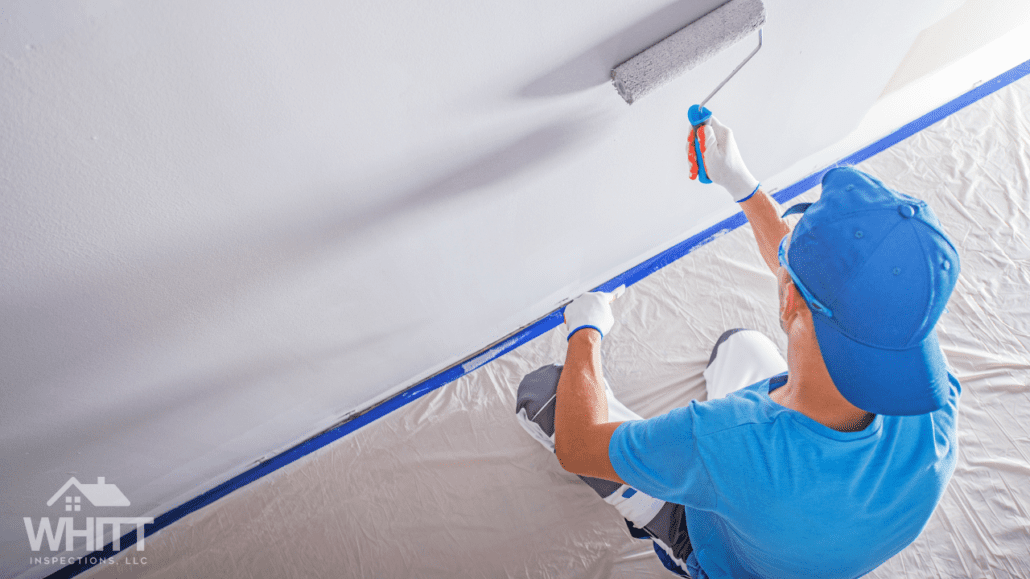
Now it’s time to break out the painter’s tape! We recommend painting the ceiling first, so secure the tape at the top of your wall at the very edge of your ceiling. If you’re not painting the ceiling, then tape off the trimmings using a good painter’s tape.
We also recommend taping around your outlets so that you do NOT paint inside the outlets or switches. That’s a BIG no-no, and potentially dangerous!
Step 4: Prime Time
This is one of our favorite tips on how to paint a room because it can save you money.
The most popular misconception we see from DIY painters is that you have to prime before painting walls. As we mentioned, primer isn’t inherently necessary for painting a room, contrary to popular belief.
There are only a few instances when you’ll need to prime beforehand:
You’re going from a dark to light color
The paint you’re going over is glossy
Your wall is porous (e.g., you have thirsty, unpainted drywall or plaster walls)
The wall is stained or has an odor
For example, if you’re going from white to Ultimate Gray and you do a quick wash of your drywall, you don’t need to waste time or money on priming.
Step 5: Paint Day
Now that you’ve taken progressive steps, you can rest assured that you’ll get the paint job completely done this weekend!
Another common question we see is which order to paint a room. Here’s our suggestion:
First, paint the ceiling (if you’re painting it at all).
Next, paint the trim (a.k.a “cutting in”).
Then, paint the walls with the most real estate using a roller paintbrush. Use light pressure to paint from top to bottom.
Some people ultimately decide to hire professional painters because they have a few tricks that seem to get the job done faster. And well— professionally.
But we decided to give you a few tips on how to paint a room that are trade secrets (so, don’t tell anyone we told you)!
As you can tell from the steps on how to paint a room, a proper prep should usually take longer than the actual painting itself.
At least, if you want a good result.
And if you want your paint to last for years to come, we recommend doing at least two coats of paint. This prevents “Flashing” or “Holiday-ing” (a common, unofficial trade term), which refers to a bad paint job where you can see a bit of the old paint color underneath.
Tip #2: “Cutting In”
This is just a fancy term for detailing at the edges of your paint job.
Cutting in is probably the most frustrating part of painting because it requires painting a straight line (such as the line between your wall and ceiling or two different wall colors).
The best way to cut in is to use a manual brush. Get the best brush you can afford for this. Try to refrain from painting the edge of your walls with a roller brush. Instead, use a stiff-bristled, angled brush to get those precise details.
Here’s a terrific video with visual tips:
Tip #3: Keep the Brush Moving
People like to dip their brush into the paint can and brush it along the side to eliminate the extra paint. After all, who wants paint splatter to end up all over the floor?
However, the better, more professional practice is to dip your brush into the paint and then pat the brush on the edge of the can to remove the excess paint. Then, quickly bring your paintbrush to the wall and keep it moving. This saves you from having to constantly dip your brush into the can, and it helps you achieve a more even paint job.
When you’re cutting in, the consistent movement helps you achieve that straight line. It also helps to use a “W” pattern with rollers to get the room painted faster and more consistently.
Ok, we said 3 extra tips, but you’re getting 4 instead. Who doesn’t like a little lagniappe?
So finally, let’s talk about the types of paint sheens you have at your disposal. It can be overwhelming so let’s look at the most popular options for interior walls:
Flat/Matte Paint: This paint hides more imperfections, but they scuff and rub away easily if you try to clean it too vigorously. You’ll notice that the interior paint (ceilings and walls) on new construction is almost always “flat” for this reason. A little tradesperson trick!
Sheen/Glossy Paint: Glossier paints are easier to clean but are shiny and show more imperfections in the wall. However, they hold up better to moisture.
Then there are options such as eggshell sheen (great for interior walls), satin (best used in kitchens and bathrooms), and semi-gloss for casings (i.e., baseboards, trim moulding, etc.).
The bottom line when it comes to tips on how to paint a room: try to choose the best quality paint and brushes that you can afford and never skimp on good prep!
https://www.whittinspections.com/wp-content/uploads/sites/51/2021/11/steps-on-how-to-paint-a-room.png7201280Stephenhttps://d3bfc4j9p6ef23.cloudfront.net/wp-content/uploads/sites/51/2022/09/07221907/white_logo_transparent_background1-1030x698-1.pngStephen2021-10-20 10:24:562021-11-11 04:28:02Wanna Know How To Paint a Room Properly? Here’s 3 Tips To NOT Screw It Up